eFootball Condition Arrows Explained: How Player Form Works
By John Ganang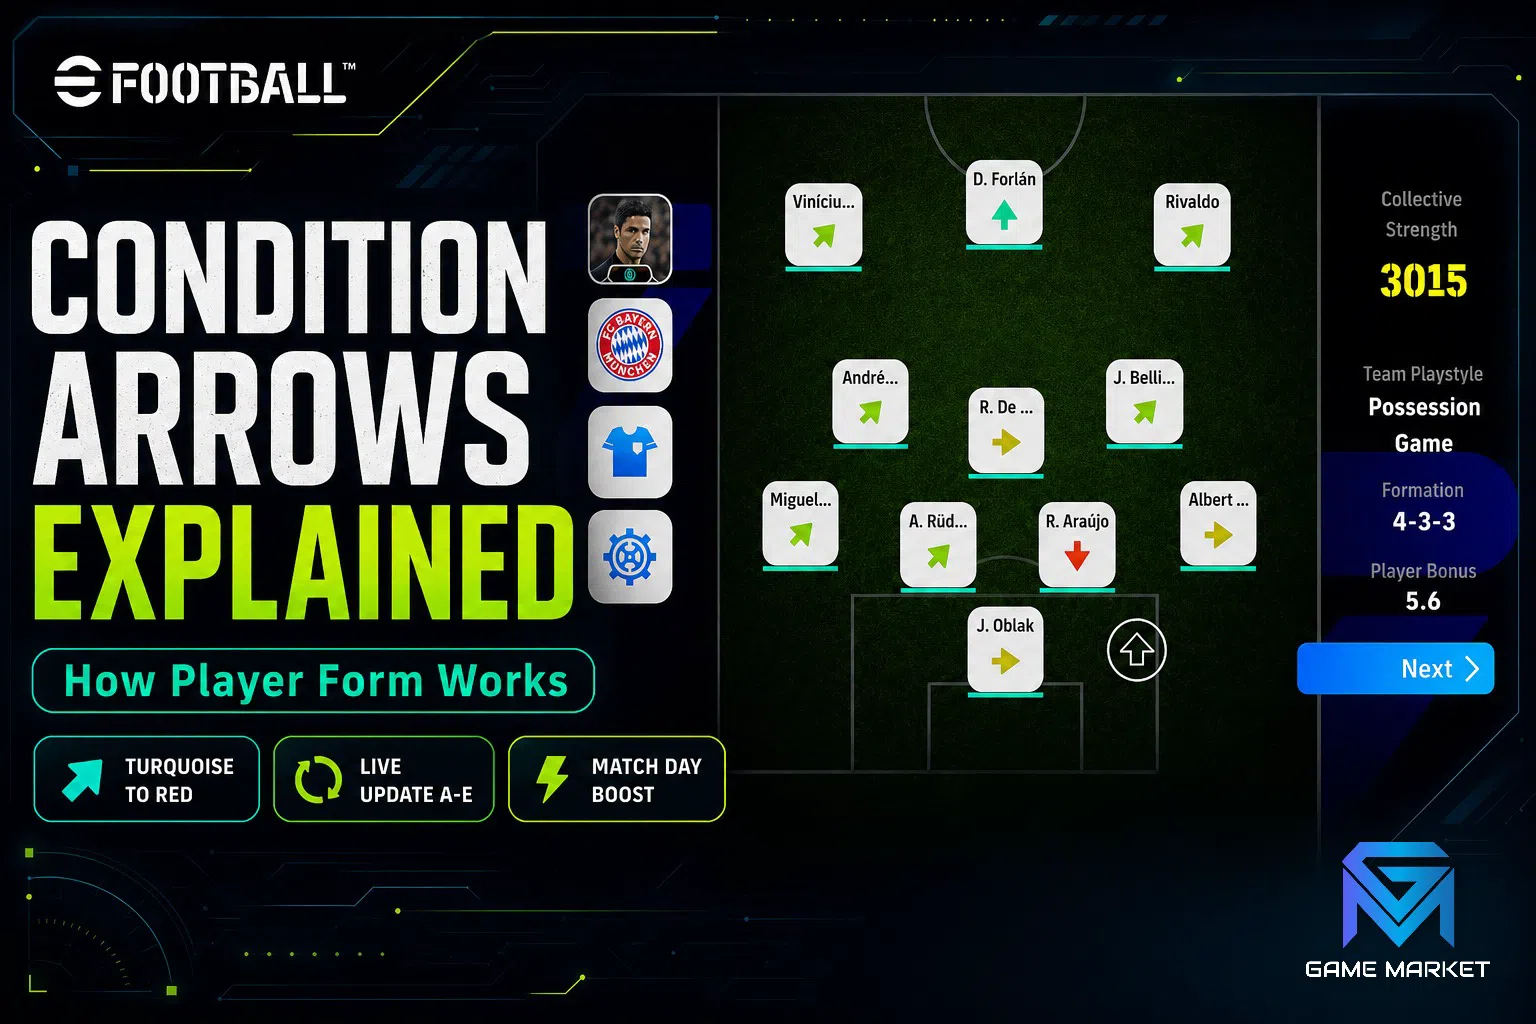
Condition arrows in eFootball are the small coloured arrows shown above each player before kickoff, and they tell you how sharp that player is for this match only. A green arrow lifts his attributes slightly, a red one drags them down, and the value is re-rolled on a schedule rather than earned. The swing is small on any single stat, but it lands on every stat at once, which is why the same eleven can feel decisive one session and heavy the next. This guide covers what the arrows represent, what decides which arrow a player gets, how far the effect really reaches, why Condition Fitness makes some cards far steadier than others, and how all of that should change both your team selection and the way you judge a card's real strength.
What are condition arrows in eFootball?
Condition is a per-match sharpness rating attached to every player in your club, displayed as a coloured arrow on his card in team selection. It runs from a red downward arrow at the bottom to a green upward arrow at the top, with a neutral horizontal state in the middle, and it applies to that fixture rather than permanently.
The arrows are best read as a five-step scale. A green upward arrow marks a player who is at his best, a light-green diagonal sits just above normal, the yellow horizontal arrow is the baseline every card is balanced around, an orange diagonal sits just below it, and the red downward arrow marks a player who will underperform his own card. Nothing about the underlying card changes: level, progression, skills and Playing Styles are untouched, and the arrow disappears once the match is over.
Konami inherited the system from the PES era, where it was called form, and the intent has always been the same. Football squads are not machines that reproduce the same output every weekend, so the arrows inject a controlled amount of variance into a squad you have otherwise optimised down to the last stat point. That framing matters for how seriously to take them: condition is designed to nudge outcomes, not decide them, and a squad that only wins when every arrow is green was never as strong as its team-strength number suggested.
How does a player get his arrow before a match?
Condition is assigned by the game, not by you. Each player's arrow is rolled from a weighted range rather than set by your recent results, and it refreshes on the game's own schedule, so you see the assignment in team selection and choose around it instead of influencing it.
The important consequence is that condition cannot be farmed. There is no rest mechanic, no training programme and no rotation pattern that reliably pushes a specific player toward green, which separates eFootball from football management games where form is a resource you manage. Attempts to game it — benching a red-arrow player for a day to "recover" him, or playing a green-arrow player repeatedly to hold the state — do not work, because the next roll is independent of what you just did.
What you can control is when you look. The arrows are visible before you confirm your lineup, so the whole system rewards the thirty seconds spent reading the squad screen rather than tapping through it. Managers who auto-confirm a saved lineup are still subject to condition; they simply never see it, and they field red arrows at exactly the same rate as everyone else. The refresh cadence and the modes it applies to have shifted across versions and between the mobile and console builds, so treat the in-game help entry on your current build as the authority rather than a habit carried over from an older season.
How much does condition actually change a player's performance?
The effect is a modest multiplier applied broadly across a player's attributes rather than a large bonus to one of them. A green arrow raises the numbers a little, a red arrow lowers them a little, and community testing consistently puts the gap between the extremes at a few points per attribute rather than a transformation.
Small per-stat numbers understate what you feel on the pitch, because the modifier is applied across the board. A striker on a red arrow is fractionally slower to the ball, fractionally less accurate with the finish and fractionally weaker in the shoulder-to-shoulder that got him there, and those three shortfalls compound inside the same three-second passage of play. That is why condition reads as a vibe rather than a stat: nobody notices two points of Finishing, but everybody notices the chance that would have gone in last week.
The effect also lands unevenly across positions, which is worth knowing before you rebuild a lineup around arrows. Roles that live on fine margins feel it most: a finisher, a creative midfielder threading passes into narrow lanes, or a last-man defender whose recovery pace decides whether a through ball becomes a chance. Roles built on positioning and structure absorb it better, because standing in the right place is not a stat that a small modifier meaningfully degrades. If you are still working out which attributes drive which role, the guide to eFootball player card types sets out how the different card families are built before condition is layered on top.
What is Condition Fitness, and why do some players swing more than others?
Condition Fitness is a hidden-in-plain-sight rating, shown on the player's detail screen on a letter scale, that governs how volatile his arrow is. A player with the top grade lands on good condition far more often and rarely bottoms out, while a player at the bottom of the scale can produce anything from green to red on consecutive days.
This single letter turns condition from noise into something you can plan around, which is why experienced managers check it before they invest. Two cards with an identical overall rating are not equally reliable if one holds a top Condition Fitness grade and the other sits near the bottom, because across a week of matches the steady player delivers close to his card almost every time and the volatile one delivers a distribution. Over a long event grind the difference in total output can exceed the difference the overall ratings implied.
The trade-off Konami builds in is that volatility often comes attached to talent. Some of the most explosive attackers carry poor Condition Fitness, so the card that wins you a match single-handedly on Tuesday is the same card that disappears on Thursday. Neither profile is wrong, but they suit different jobs: steady cards belong in the spine you field every session, and volatile ones are best used where a bad day is cheap and a good day is decisive. That is also the honest way to read a stacked squad — depth is what lets you bench a red arrow without weakening the shape, and a thin squad has to field whatever it rolls.
How is condition different from stamina?
Condition is set before kickoff and stays fixed for the whole match; stamina starts full and drains as the player runs. One decides the level you begin at, the other decides how long you hold it, and they are shown in different places for exactly that reason.
Confusing the two leads to a specific and common mistake: substituting a player because he looks off the pace early. A red arrow does not improve as the match goes on and it does not recover with rest, so a player who is underperforming his card in the tenth minute will still be underperforming it in the seventieth, whereas a player fading at seventy is usually a stamina problem that a fresh substitute solves. Reading which of the two you are looking at tells you whether the fix is a change now or a different lineup next time.
The two also interact at the end of matches, which is where a lot of goals live. A tired player on a poor arrow is compromised twice over in the closing stages, so if you are protecting a lead, the player to withdraw first is the one carrying both problems rather than the one with the lowest stamina bar. Extra time in knockout formats sharpens this further: depth on the bench is worth more than a marginally better starter, because the eleven that finishes the match matters more than the eleven that started it. Rotation also has a running cost of its own, which the breakdown of eFootball Coins and GP puts in context when you are deciding how deep a squad you can afford to keep match-ready.
How should condition change your team selection?
Use the arrows to break ties, not to rebuild the team. When two players are close in rating and role, field the one with the better arrow; when a clearly superior player has a poor arrow, he usually still beats a much weaker player on green, because condition is a modifier and the ratings gap is the base.
The gap that flips the decision is narrower than most managers assume and wider than a single arrow step. Roughly speaking, a one-step difference in condition is worth less than a meaningful gap in overall rating and Playing Style fit, so a top card on an orange arrow is normally still the right pick over a bench player on green. The exception is the full extreme: a red arrow on a card that is only marginally better than its replacement is a genuine reason to change, especially in a position where fine margins decide chances.
Chemistry is the constraint that stops this from becoming a simple sort by arrow colour. Swapping a red-arrow player for someone who breaks the team's Playing Style links or plays out of position trades a small statistical loss for a structural one, and structure is worth more across ninety minutes than a couple of attribute points. The rule that survives contact with real matches is therefore narrow: change for condition only when the replacement fits the same role natively, and leave the shape alone otherwise. For the modes where those margins actually decide your week, the overview of the best ways to earn Coins and GP shows which fixtures are worth fielding your strongest available eleven for.
Does condition change how you should judge a card's real strength?
Yes, and it is the part of card evaluation most people skip. A card's true value is its output across many matches, not its ceiling on a good day, so Condition Fitness belongs beside overall rating, Playing Style and skills whenever you weigh up whether a card deserves a starting place.
This reframes a familiar frustration. A card that looked outstanding in the pack preview and disappointing in practice has often not been misjudged on its attributes at all; it simply carries poor Condition Fitness, so the version you tested was its best day and the version you play most weeks is not. The reverse happens too: an unglamorous card with a top fitness grade quietly out-earns flashier options because it turns up at close to full strength every session, which over a month of daily play is the outcome that actually accumulates.
The practical test before you commit progression to a card is to judge it on the day it plays worst rather than the day it plays best. Ask whether the card is still good enough for your first eleven on an orange arrow, because heavy training investment locks you into fielding that player regularly and the poor days are part of what you are buying. Steady cards reward long investment; volatile ones are better kept as impact options you rotate in when the arrow is kind. The same logic applies to the routes you use to add cards in the first place, and the explainer on Chance Deals and nominating contracts covers how targeted signings work when you are chasing a specific profile rather than a specific name.
Frequently asked questions
Can I do anything to improve a player's condition arrow? No. The arrow is assigned by the game and refreshes on its own schedule, so no amount of resting, rotating or training will steer it. The only lever you hold is Condition Fitness, and that is a property of the card you choose rather than something you can raise.
Does a green arrow change a player's displayed overall rating? The card's overall rating is the baseline and is not rewritten by condition. The modifier is applied to the attributes behind it for that match, which is why a green-arrow player performs above his listed number without the number itself moving.
Is condition applied in every mode? Which fixtures apply condition has varied between versions and between the mobile and console builds, so the in-game help entry for your current build is the reliable answer. The safe habit is to check the squad screen before confirming a lineup in any competitive mode.
Should I avoid signing players with poor Condition Fitness? Not automatically. Volatile cards are often the most explosive ones, and they are excellent in a rotation slot where a bad day costs you little. The mistake is building your permanent spine out of them, because a spine needs to arrive at close to full strength every session.
My whole team is on red arrows. Did I do something wrong? No. Condition is rolled per player, so a whole squad landing low on the same day is unusual but entirely possible, and it says nothing about your management. Field the strongest shape you have, accept a slightly worse day, and check again at the next refresh.
Where to Find eFootball Accounts and Top Up
On GameMarket.gg you can browse eFootball accounts on GameMarket, other eFootball listings.
If you want the squad depth that makes condition a scheduling detail rather than a weekly problem, browse the eFootball top up listings on GameMarket.gg and pick the option that fits how much rotation your club actually needs. New managers building toward that point will find the groundwork in the eFootball beginner's guide to player cards, coins and squads.
GameMarket.gg is a trusted digital marketplace for everything gaming-related. We serve the gaming community by providing secure access that enhances every gaming journey.