

Arknights: Endfield
Perlica Best Build Guide | Arknights: Endfield Weapons, Gear & Teams
Perlica Best Build: Weapons, Gear Sets & Teams | Arknights: Endfield Perlica is a powerful Electric Caster support DPS in Arknights: Endfield, designed to apply Electric Infliction and Electrification to amplify Arts damage across the team. Rather than acting as a pure DPS carry, she excels at enabling elemental reactions and increasing burst windows during stagger phases. This guide explains how to build Perlica effectively, including her skill priorities, best weapons, optimal gear sets, stat focus, and team compositions. Perlica Operator Overview Attribute Details Rarity 5★ Element Electric Weapon Type Arts Unit Class Caster Role Electric Infliction, Electrification Support Perlica’s kit focuses on applying Electric Infliction consistently and triggering Electrification, which increases the Arts damage enemies receive. This makes her particularly effective in Electric teams or hybrid Arts compositions where elemental reactions play a central role. Her abilities allow teams to reliably trigger reactions without complicated setup, making her a strong and accessible support option. How Perlica’s Kit Works Perlica’s gameplay revolves around maintaining Electric Infliction uptime and triggering Electrification to amplify damage. Her rotation generally follows this structure: Apply Electric Infliction using her Battle Skill. Trigger Electrification through her Combo Skill. Enable teammates to capitalize on increased Arts damage taken. Use her Ultimate during stagger windows to maximize burst damage. Because of this design, she works best with allies who can consistently trigger elemental reactions or stagger phases. Perlica Skill Priority Skill Priority Reason Protocol α: Breach (Basic Attack) ★ Minimal importance since Perlica relies on skill damage and reactions. Protocol ω: Strike (Battle Skill) ★★★★ Core skill for applying Electric Infliction and enabling elemental reactions. Instant Protocol: Chain (Combo Skill) ★★ Used to force Electrification and increase Arts damage taken by enemies. Protocol ε: 70.41K (Ultimate) ★★★ Primary burst ability and important for stagger window damage. Upgrade order:Battle Skill → Ultimate → Combo Skill → Basic Attack. Best Weapons for Perlica Perlica scales primarily with Intellect, with Will serving as a secondary stat. Weapons that increase Arts Damage or Arts Intensity synergize best with her kit. Best-in-Slot Weapon Stanza of Memorials (5★) Base ATK: 411 Stat 1: Intellect +124 Stat 2: ATK +31.2% Passive – Lustrous Pyre Max HP +28% When casting an Ultimate, operators with different elements gain +22.4% ATK for 20 seconds This weapon boosts both Perlica’s survivability and team damage, making it her strongest support-focused option. Alternative Weapons Detonation Unit (6★) Arts Intensity +78 Secondary Attribute +16% Applies Arts DMG Taken +14.4% after triggering an Arts Burst, significantly increasing team damage output. Oblivion (6★) Intellect +156 Arts DMG +43.33% Provides large personal damage boosts after casting Ultimate or Combo Skill. Wild Wanderer (5★) Intellect +124 Electric DMG +34.67% After applying Electrification: Team gains +22.4% Physical and Electric damage Great option for Electric-focused teams. Essence Upgrade Priority For optimal weapon scaling: Stanza of Memorials Intellect Boost Attack Boost Twilight Twilight Attack Boost Intellect Boost This maximizes both Perlica’s personal damage and team buff potential. Best Gear Sets for Perlica Early builds should focus on Intellect, Will, and Arts Intensity to increase reaction damage. Early Game Gear Mordvolt Insulation Vest T1 Mordvolt Insulation Gloves Mordvolt Insulation Wrench T1 Mordvolt Insulation Wrench T1 These provide reliable Arts scaling while developing elemental reaction setups. End Game Gear – Pulser Labs Set Best overall late-game gear for Perlica. Recommended pieces Pulser Labs Disruptor Suit Æthertech Gloves Pulser Labs Calibrator Pulser Labs Calibrator This set boosts Arts Intensity and grants strong Electric Damage bonuses after Electrification, perfectly aligning with Perlica’s Combo Skill. Best Stat Priority Main stats: Intellect Will Arts Intensity Attack % Sub-stats should prioritize: Electric Damage bonuses Reaction damage scaling Ability uptime These stats maximize Perlica’s ability to amplify team damage through Electrification. Best Team Compositions Perlica performs best in Electric or hybrid Arts teams that frequently trigger elemental reactions. Team Option 1 – Electric Reaction Core Yvonne (Main DPS) Xaihi (Support) Perlica (Reaction Support) Gilberta (Support) This composition focuses on continuous Electrification and reaction damage. Team Option 2 – Hybrid Arts Burst Last Rite (DPS) Xaihi (Support) Perlica (Reaction Support) Ardelia (Support) A balanced team that combines Arts burst damage with reaction amplification. Team Option 3 – Accessible Hybrid Team Avywenna Perlica Arclight Antal A more accessible team composition that still leverages elemental reactions effectively. Perlica Best Potentials P1 – Crisis Handling (Very Good) Electrification duration +75% This dramatically improves uptime for the Arts damage debuff. P2 – Negotiation Tactics (Low) Ultimate energy cost -15% Provides more frequent Ultimate usage but has limited impact on team support. P3 – Supervisory Duties (Low) After applying Electrification: ATK +20% for 5 seconds (up to 2 stacks) Improves personal burst damage but does not significantly affect team amplification. P4 – Constant Guidance (Very Good) Electrification now increases Arts DMG Taken duration by 1.33×. One of her best upgrades for team damage. P5 – Reentry Control (Low) Ultimate CRIT Rate +30% Increases personal damage but offers little additional support value. Final Thoughts Perlica is one of the most reliable reaction enablers in Arknights: Endfield, providing consistent Electrification and strong Arts damage amplification. While she may not dominate the damage charts herself, her ability to enhance team burst windows and maintain elemental reactions makes her a valuable asset in Electric and hybrid Arts compositions. If your team needs a dependable support for elemental reaction strategies, Perlica is an excellent and accessible option. If you want to strengthen your roster and experiment with optimized Electric teams, you can explore Accounts, Hourly Services, and Boosting for Arknights: Endfield. Building strong operators and refining gear setups can significantly improve your team’s performance in difficult endgame encounters. GameMarket.gg is a trusted digital marketplace for everything gaming-related. We serve the gaming community by providing secure access that enhances every gaming journey.
Arknights: Endfield
Lifeng Best Build Guide | Arknights: Endfield Weapons, Gear & Teams
Lifeng Ultimate Build: Weapons, Gear Sets & Teams | Arknights: Endfield Lifeng is one of the strongest Physical-support DPS operators in Arknights: Endfield, designed to amplify team damage through Physical Susceptibility, Vulnerability stacking, and Link burst windows. While he can contribute respectable personal damage, his real strength lies in enabling coordinated Physical rotations that allow allies to unleash amplified burst attacks. This guide explains how to build Lifeng effectively, including his best weapons, gear sets, skill priorities, stat focus, and optimal team compositions. Lifeng Operator Overview Attribute Details Rarity 6★ Element Physical Weapon Type Polearm Class Guard Role Knock Down, Physical Susceptibility, Link Support Lifeng functions as a hybrid enabler and sub-DPS. His gameplay revolves around applying Physical statuses to trigger Vulnerability stacks, enabling combo skills, and granting Link, a powerful buff that amplifies the next Battle Skill or Ultimate used by his team. When properly supported, he significantly increases team burst damage during coordinated rotations. How Lifeng’s Kit Works Lifeng thrives in structured Physical compositions that can reliably trigger: Crush Breach Vulnerability stacks His core gameplay loop includes: Applying Knock Down to build Vulnerability stacks. Triggering Physical Susceptibility through his Battle Skill. Activating Link via Combo Skill to amplify the next team burst. Timing the team’s Battle Skills and Ultimates during Link windows. Because of this, Lifeng excels when paired with teammates who can convert those Vulnerability stacks into high-damage bursts. Lifeng Skill Priority Skill Priority Reason Ruination (Basic Attack) ★ Lowest priority; minimal impact on rotations. Turbid Avatar (Battle Skill) ★★★★ Most important skill. Applies Physical Susceptibility and Knock Down, enabling Vulnerability stacking and Combo triggers. Aspect of Wrath (Combo Skill) ★★★ Grants Link to the entire team, amplifying the next Battle Skill or Ultimate. Heart of the Unmoving (Ultimate) ★★ Highest damage multiplier but less essential unless Lifeng is built as a main DPS. Upgrade order:Battle Skill → Combo Skill → Ultimate → Basic Attack. Best Weapons for Lifeng Lifeng scales primarily with Agility, with Strength serving as a secondary stat to increase damage and Link amplification. Weapons that increase Physical Damage or ATK% work best with his kit. Best-in-Slot Weapon Mountain Bearer (6★) Base ATK: 500 Stat 1: Agility +156 Stat 2: Physical DMG +43.33% Passive – Weight of Mountain +32% DMG against Vulnerable enemies +12.8% All Attributes when applying Vulnerability +12.8% All Attributes when applying Physical Susceptibility This weapon synergizes perfectly with Lifeng’s rotation, making it his strongest option. Alternative Weapons Valiant (6★) Agility +156 Physical DMG +43.33% Passive triggers additional Physical damage after applying status effects, making it a strong secondary option. Pathfinder’s Beacon (4★) Agility +93 ATK +23.4% Provides strong ATK boosts when above 80% HP, making it a solid budget weapon. Chimeric Justice (5★) Strength +124 Ultimate Energy Gain +37% Grants ATK buffs when applying Vulnerability stacks. Essence Upgrade Priority For optimal weapon scaling: Mountain Bearer Agility Boost Physical DMG Boost Efficacy Efficacy Physical DMG Boost Agility Boost This setup maximizes both Lifeng’s personal damage and team burst amplification. Best Gear Sets for Lifeng Early game gear should focus on Agility, Strength, and Physical Damage bonuses. Early Game Gear Roving MSGR Jacket Roving MSGR Fists Roving MSGR Flashlight Armored MSGR Gyro These pieces provide balanced offensive stats while Lifeng develops his rotation. End Game Gear Option 1 – Swordmancer Set Best for damage and stagger phases. Swordmancer Heavy Armor Swordmancer TAC Gauntlets Swordmancer Flint Bonekrusha Mask This set improves stagger output and helps teams trigger additional vulnerability phases. End Game Gear Option 2 – Eternal Xiranite Set A team-support focused build. Eternal Xiranite Armor Eternal Xiranite Gloves Swordmancer Flint Eternal Xiranite Power Core This setup trades some personal DPS for stronger team buffs. Best Stat Priority Main stats: Agility Strength Physical Damage Attack % Sub-stats should prioritize: Physical Damage bonus ATK scaling Status application consistency These stats maximize Lifeng’s effectiveness as both a damage amplifier and sub-DPS. Best Team Compositions Lifeng performs best in Physical damage teams that can rapidly stack and consume Vulnerability. Team Option 1 – Physical Burst Core Endministrator (Main DPS) Lifeng (Support DPS) Chen Qianyu (Support) Ardelia (Support / Sustain) This setup focuses on coordinated burst windows using Link amplification. Team Option 2 – Balanced Physical Composition Lifeng Da Pan Chen Qianyu Pogranichnik This lineup offers consistent Vulnerability stacking and sustained damage. Team Option 3 – Aggressive Physical Burst Lifeng Da Pan Chen Qianyu Pogranichnik This team excels at converting Link buffs into heavy burst rotations. Lifeng Best Potentials P1 – Breaking the Obsession (Very Good) +5% Physical Susceptibility Allows teammates to initiate Vulnerability stacks This is his most impactful early upgrade, improving flexibility in rotations. P2 – Self Refinement (Low) All Attributes +15 Minor personal stat increase. P3 – Spiritual Cultivation (Low) Improves scaling from Intellect and Will stats but has minimal rotation impact. P4 – Brief Instant (Good) Ultimate energy cost reduced by 15% Allows more frequent Ultimate usage and Vulnerability application. P5 – Unremitting (Very Good) Every 15 seconds: Next triggered effect deals +250% ATK Physical DMG Adds 5 Stagger Provides strong passive damage without altering gameplay flow. Final Thoughts Lifeng stands out as a powerful enabler for Physical teams in Arknights: Endfield, offering a combination of Vulnerability stacking, Physical Susceptibility, and Link burst amplification. When paired with the right teammates and properly timed rotations, he can dramatically increase the damage ceiling of Physical compositions. Endmins looking to maximize burst damage windows and maintain consistent Vulnerability pressure will find Lifeng to be an exceptionally valuable addition to their roster. If you want to optimize your roster and experiment with top Physical team builds, you can explore Accounts, Hourly Services, and Boosting for Arknights: Endfield. Preparing the right operators and resources ahead of major updates can make a big difference in mastering new team strategies. GameMarket.gg is a trusted digital marketplace for everything gaming-related. We serve the gaming community by providing secure access that enhances every gaming journey.
Arknights: Endfield
Best Pogranichnik Build in Arknights Endfield With Team Strategy
🛡️ Pogranichnik Build Anchors Physical Combat in Endfield Among the early standout operators in Arknights: Endfield, Pogranichnik quickly earns a reputation as a dependable frontline damage dealer. Armed with a sword and built around Physical damage output, he excels when positioned at the center of combat where enemies naturally gather. Instead of relying on dramatic burst windows, Pogranichnik steadily pressures enemies with consistent attacks and rapid skill rotations that keep the fight moving forward. The appeal of a Pogranichnik Build lies in how naturally he fits into Endfield’s real-time combat rhythm. While other operators prepare cooldowns or reposition, Pogranichnik remains engaged—absorbing pressure, generating resources, and keeping enemies occupied. In practice, this shifts how many teams operate. Rather than treating frontline characters purely as tanks or defensive anchors, Pogranichnik becomes a hybrid role: a combat stabilizer who maintains damage output while enabling teammates to unleash their strongest abilities at the right moment. ⚔️ Best Pogranichnik Build A strong Pogranichnik Build focuses on sustained Physical damage, skill uptime, and survivability. Since he spends extended time on the battlefield, equipment that improves consistency is more valuable than short bursts of damage. Best Weapon Choices The strongest weapons for Pogranichnik emphasize steady Physical damage and combat flow. Top options include: Never Rest – Best-in-slot weapon for maximizing sustained damage output Thermite Cutter – Reliable early and mid-game option Eminent Repute – Balanced weapon with strong scaling Rapid Ascent – Improves combat tempo and attack rhythm These weapons help Pogranichnik maintain constant pressure during long encounters where sustained damage becomes crucial. 🧰 Best Gear Setup Because Pogranichnik frequently remains in the middle of combat, gear should reinforce both durability and offensive consistency. Recommended Endgame Gear Frontiers Armor T3 LYNX Gloves Frontiers Extra O2 Tube This combination provides a balanced stat profile that improves survivability while maintaining strong damage potential. The added durability allows Pogranichnik to remain active on the battlefield longer, which is critical for sustained DPS builds. 🌱 Early Game Pogranichnik Build Before unlocking advanced gear, players can still build a reliable early version of Pogranichnik. Early Weapons Thermite Cutter Sundering Steel Early Gear Mordvolt Resistant Vest Mordvolt Resistant Gloves Mordvolt Resistant Wrench These items provide enough defensive stability and damage output to comfortably progress through early missions and exploration zones. 🧑🤝🧑 Best Pogranichnik Teams Pogranichnik works best when placed in teams that emphasize Physical damage synergy and steady skill rotations. Mono Physical Team Pogranichnik + Endministrator + Da Pan + Lifeng / Chen Qianyu This composition focuses on coordinated Physical damage output. Pogranichnik maintains frontline pressure and supports team rotations Endministrator functions as the primary single-target DPS Da Pan contributes strong area damage Lifeng or Chen Qianyu provide support and additional offensive pressure Together, this team creates a stable combat flow where enemies remain under constant attack. 🎮 How to Play Pogranichnik Control the Frontline Position Pogranichnik near enemy groups so his attacks can consistently connect. Maintain Skill Rotation Frequent skill usage keeps damage output stable and ensures Pogranichnik remains active throughout the fight. Support Team Damage Windows While Pogranichnik engages enemies directly, other operators can safely prepare high-impact abilities. Maintain Combat Momentum His performance improves when battles remain continuous rather than fragmented by long pauses or disengagements. 🧩 Blueprint: Optimizing a Pogranichnik Build Step 1 — Choose Consistent Weapons Prioritize weapons that enhance Physical damage and allow Pogranichnik to maintain steady attack flow. Step 2 — Balance Offense and Defense Frontline operators must survive long encounters, so durability stats should not be ignored. Step 3 — Build Around Physical Synergy Teams that amplify Physical damage or generate SP resources greatly increase Pogranichnik’s effectiveness. Step 4 — Maintain Aggressive Positioning Keeping Pogranichnik close to enemies allows him to fully utilize his sustained combat design. When optimized correctly, Pogranichnik becomes a reliable frontline operator capable of anchoring entire battles through consistent damage and battlefield control. If you're preparing your squad for Arknights Endfield’s expanding combat systems, you can explore powerful operator progress through Arknights Endfield Accounts, accelerate character upgrades with expert Hourly Services, or enhance your progression using trusted Boosting. GameMarket.gg is a trusted digital marketplace for everything gaming-related. We serve the gaming community by providing secure access that enhances every gaming journey.

Arknights: Endfield
Arknights: Endfield Last Rite Guide – Burst Cryo Hypercarry
Last Rite Best Build: Weapons, Gear Sets & Teams | Arknights: Endfield Last Rite is a 6★ Cryo Striker in Arknights: Endfield who specializes in explosive single-target burst through Cryo Infliction stacking and consumption. Unlike sustained DPS units, she revolves around building up Inflictions with her Battle Skill and teammates, then detonating them with her Combo Skill for massive burst windows. She performs best as a Cryo hypercarry, shredding bosses and elite enemies during tightly structured rotations. This guide covers her optimal skill upgrades, weapons, gear sets, and team compositions. Last Rite Operator Overview Rarity: 6★Element: CryoWeapon Type: GreatswordClass: StrikerRole: Damage Dealer, Cryo Infliction Core Playstyle Apply Cryo Inflictions (Battle Skill + teammates) Reach at least 3 stacks Consume stacks via Winter’s Devourer (Combo Skill) Apply Cryo Susceptibility Follow with Ultimate for peak burst Her damage profile is heavily frontloaded into burst windows rather than sustained output. Skill Upgrade Priority Skill Priority Reason Winter’s Devourer (Combo Skill) ★★★★ Primary damage source. Consumes Cryo Inflictions and applies Cryo Susceptibility. Vigil Services (Ultimate) ★★★ Highest single-instance burst. Scales extremely well with susceptibility. Esoteric Legacy of Seš'qa (Battle Skill) ★★ Applies Inflictions and generates Ultimate Energy. Dance of Rime (Basic Attack) ★ Minimal contribution to total DPS. Why Combo Skill First? Most of Last Rite’s damage comes from: Consuming stacked Inflictions Cryo Susceptibility synergy Burst cycling Maximizing Combo Skill first significantly increases her boss-killing potential. Best Weapons & Essence Priority Last Rite scales primarily with Strength, with Will serving as a strong secondary stat due to ATK% conversion. She benefits most from: Skill Damage bonuses Cryo DMG bonuses Ultimate Damage Strength scaling Best-in-Slot — Khravengger (6★) Base ATK: 505Stat 1: Strength +156Stat 2: ATK +39% Effect — Detonate: Bonechilling Skill DMG +32% Applying Cryo Infliction → Cryo DMG +16% (15s) Combo Skill on Inflicted enemy → Cryo DMG +32% (15s) The two effects stack separately. Why It’s Best Double Cryo amplification Direct Skill scaling Perfect synergy with Infliction stacking This weapon maximizes her burst windows. Strong Alternatives 1️⃣ Sundered Prince (6★) Strength +156 CRIT Rate +19.5% ATK boost on Final Strike Strong stat stick with reliable burst enhancement. 2️⃣ Seeker of the Dark Lung (5★) Strength +124 Ultimate Gain Efficiency +37.14% ATK stacking mechanic Good for faster Ultimate cycling builds. 3️⃣ Industry 0.1 (4★) Budget option. Strength +93 ATK +23.4% ATK buff on Battle Skill hit Solid early-game choice. Essence Upgrade Priority For Khravengger: Strength Boost ATK Boost Detonate Detonate ATK Boost Strength Boost Always prioritize Strength and Skill amplification. Best Gear Sets Early Game Focus on: Strength Skill Damage Recommended: Aburrey Light Armor Armored MSGR Gloves Aburrey Auditory Chip These stabilize early burst potential. Late Game — Tide Surge (Best-in-Slot) Tide Surge significantly boosts: Skill Damage Arts Damage after multiple Inflictions Since Last Rite’s entire identity revolves around Infliction stacking, this set perfectly complements her burst cycle. Best Team Compositions Last Rite requires teammates that: Apply Cryo consistently Provide resistance shred Amplify Arts damage Enable structured rotations Her damage ceiling depends heavily on reliable Infliction stacking before Combo Skill consumption. Team Option 1 (Optimal) Last Rite (Main DPS) Perlica Xiahi Ardelia Balanced Cryo stacking and amplification. Team Option 2 (Accessible) Last Rite Fluorite Xiahi Ardelia More budget-friendly Cryo application. Team Option 3 (Alternative Rotation) Last Rite Akekuri Xiahi Ardelia Focuses on smoother Infliction cycling. Best Potentials (Breakpoints) P3 — Overlord of Winter ★★★★ Combo Skill & Ultimate multiplier ×1.15 Major DPS spike.Highly recommended stopping point. P4 — Sincere Wake ★★★★ Ultimate Energy cost -15% Massive rotation flexibility.Improves burst frequency.Often considered her strongest breakpoint. P5 — Winter is Returning ★★★ More SP return Slight Battle Skill damage increase Useful for smoother rotations. P1 / P2 — Minor Upgrades Small DPS increases. Not mandatory. Why Last Rite Is a Boss Killer Her gameplay loop: Stack Cryo Inflictions Trigger Combo Skill Apply Cryo Susceptibility Follow with Ultimate Repeat This creates devastating damage spikes against: Elite enemies Bosses High-HP targets She is less optimal in multi-target sustained scenarios but excels in focused burst fights. Final Thoughts Last Rite is a high-ceiling Cryo hypercarry built around precise Infliction management. When supported properly, she delivers some of the strongest single-target burst damage in Arknights: Endfield. Players who enjoy structured rotations and explosive damage windows will find her extremely rewarding. If you’re aiming to fully optimize Last Rite without wasting resources, the GameMarket.gg community can help accelerate your progress. Explore powerful Accounts, book professional Hourly Services for build optimization and farming routes, or use Boosting to clear the toughest Endfield challenges efficiently. GameMarket.gg is a trusted digital marketplace for everything gaming-related. We serve the gaming community by providing secure access that enhances every gaming journey.
Arknights: Endfield
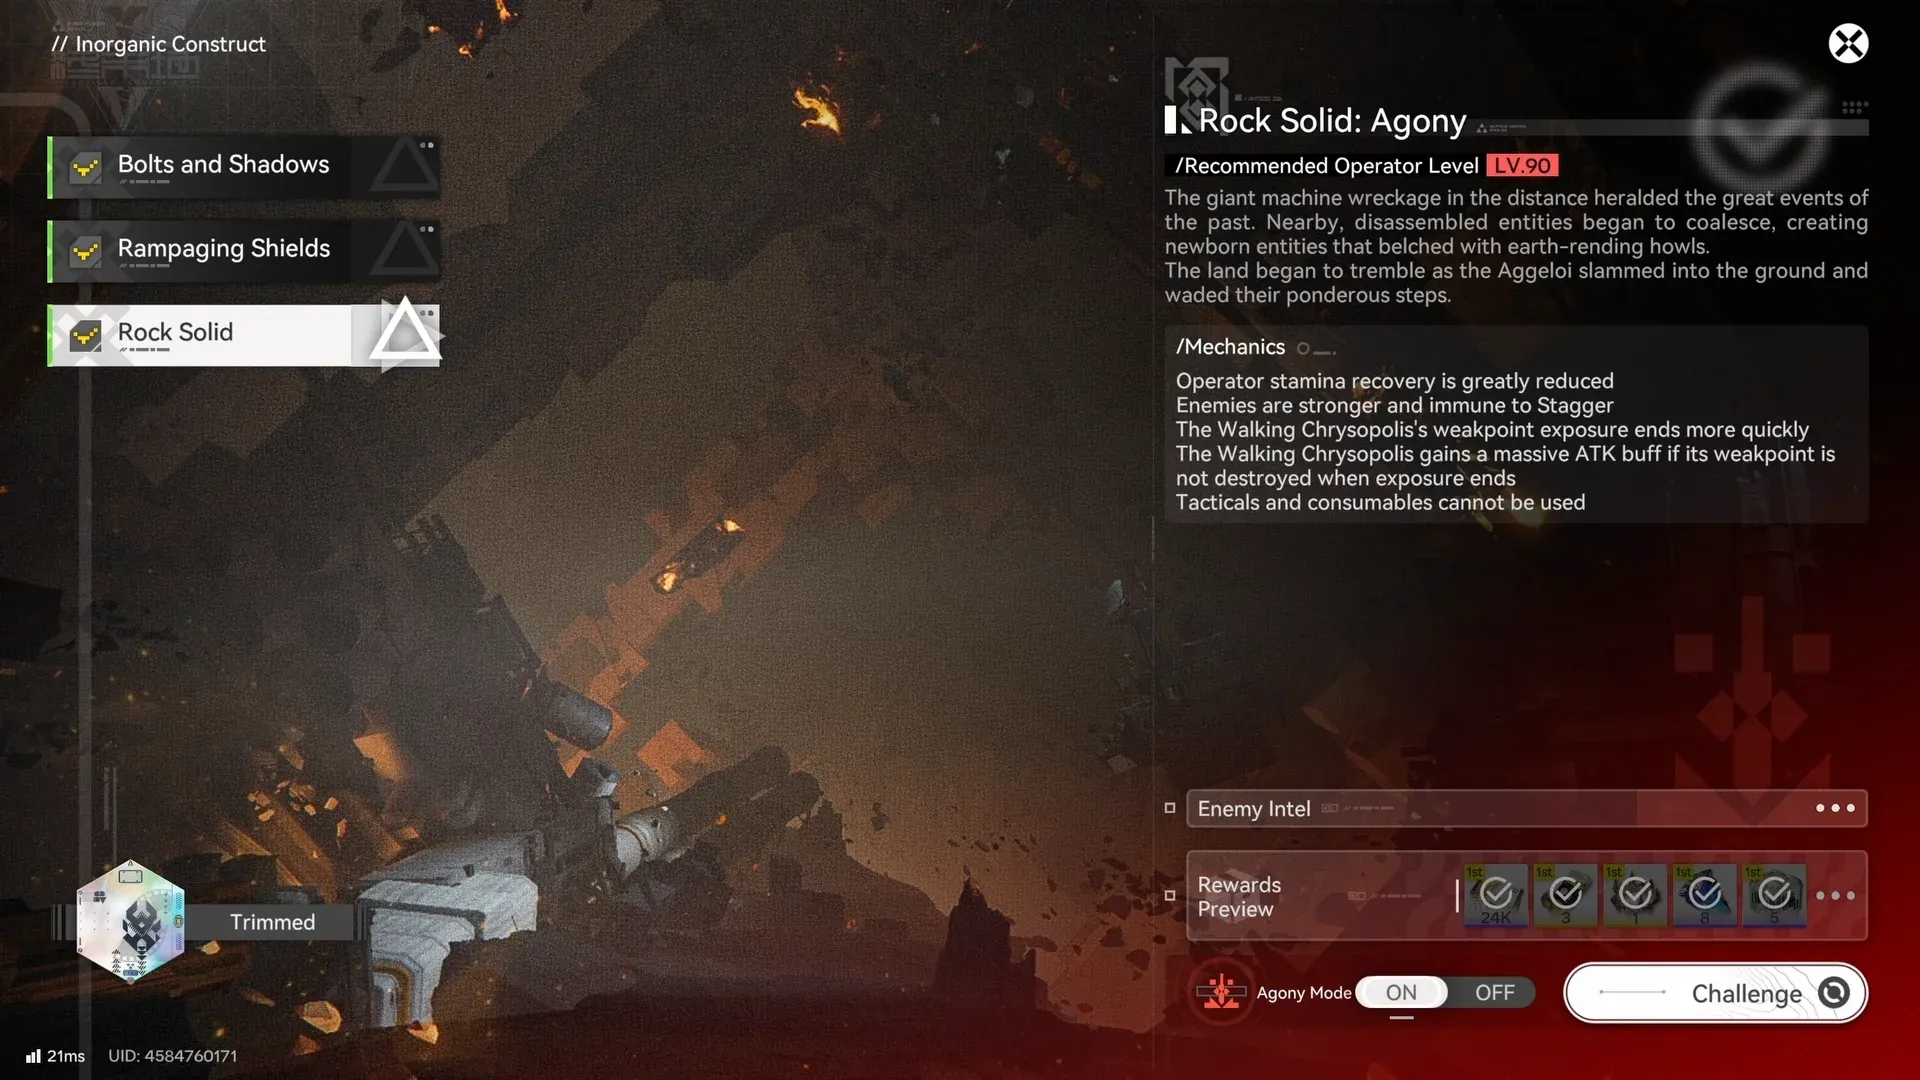
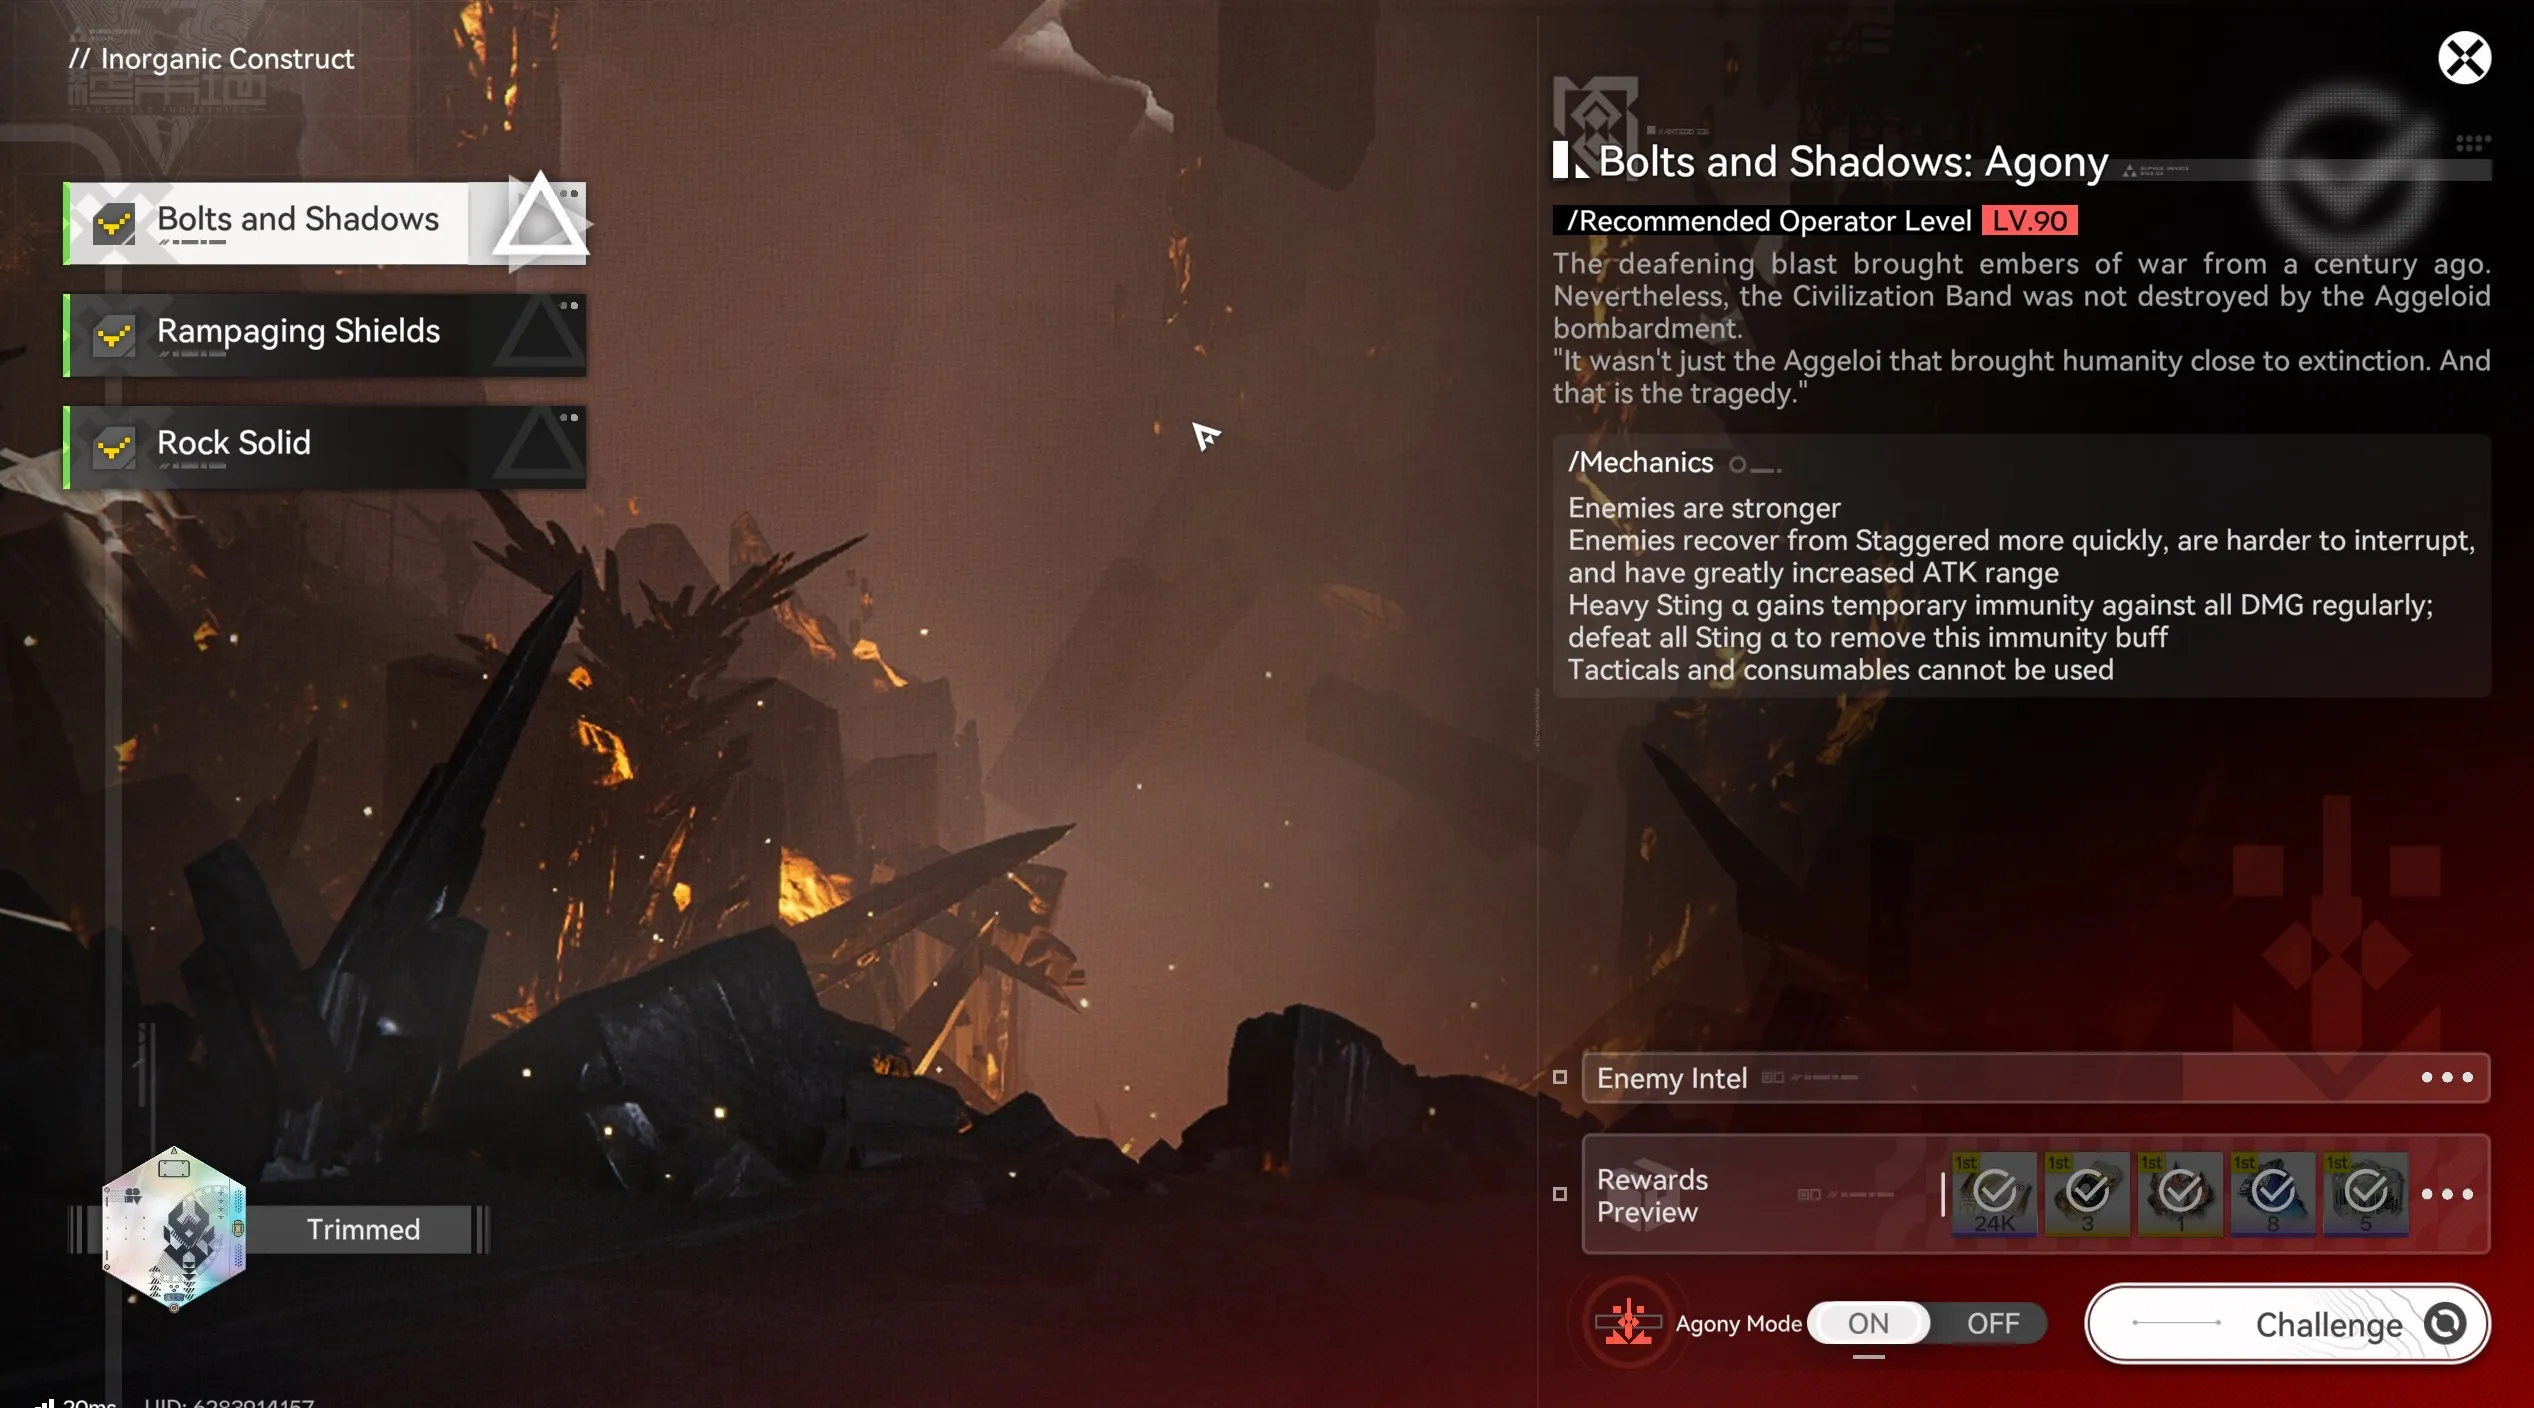
Endfield Guide: Rock Solid Agony Weakpoint Strategy
🗿 Arknights Endfield Guide: Rock Solid Stage 3 This Guide delivers a full narrative and mechanical breakdown of Rock Solid, Stage 3 of Inorganic Construct, covering Walking Chrysopolis attack cycles, shield phases, weakpoint destruction timing, stamina management, Agony mode penalties, and optimized burst rotations. Rock Solid feels different the moment the Walking Chrysopolis lumbers into view. The arena shakes under its weight, shields harden across its massive frame, and every movement telegraphs something dangerous. Unlike the earlier stages where stagger control gave you breathing room, this encounter strips that comfort away—especially in Agony. You are no longer rewarded for chaining knockdowns. You are tested on timing, positioning, and whether you can dismantle its exposed core before it punishes you with overwhelming force. This isn’t a damage race. It’s a discipline check. 🌋 Stage Overview Recommended Operator Level Normal: Lv. 60 Agony: Lv. 90 Core Mechanics Normal Mode Walking Chrysopolis deals higher damage and has increased durability. Agony Mode Operator stamina greatly reduced. Enemy immune to Stagger entirely. Weakpoint exposure window shortened. If weakpoint is not destroyed in time: Chrysopolis gains a massive ATK buff. No Tacticals or consumables. Agony removes your fallback systems. You cannot rely on stagger loops, consumables, or panic resets. The only safe path is correct execution. 🏛 Understanding Walking Chrysopolis Resistance Profile Physical: C Heat: C Cryo: C Electric: D (primary weakness) Nature: C Electric damage has the cleanest conversion here, but no team can ignore mechanics. Core Attack Patterns Walking Chrysopolis operates in repeating cycles: 1. Tremor Slam Sequence Wide-range ground shockwaves that punish greedy melee positioning. 2. Shielded Advance Reduces damage taken from the front and sides. 3. Jump Attack Leaps into the air, slams down, and triggers weakpoint exposure. 4. Weakpoint Window Rear core becomes vulnerable for a short duration. 5. Enrage Punishment (Agony) If weakpoint survives exposure, ATK spikes dramatically. The entire fight revolves around recognizing and exploiting this jump cycle. ⚡ The Weakpoint Phase – Your Only Real Opening When Chrysopolis lands from its jump, its back core glows and becomes targetable. During this window: Frontal shield still reduces damage. Rear core takes full damage. Exposure duration is brief. In Agony, the window closes faster. If you fail to destroy the weakpoint: Chrysopolis gains a massive ATK buff. Its slams become far more lethal. Fight tempo accelerates dangerously. Every rotation should be built around preparing for this moment. ⚔️ Best Team Archetypes ⚡ Avywenna Electric Burst Team Avywenna / Arclight / Perlica / Gilberta This is the most mechanically forgiving setup. Why it excels: Thunderlances persist for 30 seconds (50 at Potential 2). Lances can be retrieved during weakpoint exposure. Electric resistance is lowest. Controlled burst aligns perfectly with exposure windows. Avywenna turns weakpoint phases into predictable kill checks rather than frantic scrambles. ❄️ Yvonne Cryo Ranged Team Yvonne / Last Rite / Xaihi / Fluorite Strengths: Safe ranged pressure. Can attack during aerial movement. Cryo stacking maintains consistent damage. Easier stamina management. Ideal for players who want safer spacing rather than high-risk melee positioning. 🔥 Laevatain Hypercarry Team Laevatain / Akekuri / Wulfgard / Ardelia Advantages: Flexible burst timing. Can preload buffs before exposure. Ultimate + Combo Skill chain deletes weakpoint quickly. Requires disciplined cooldown banking but delivers explosive windows. 🎯 How to Beat Rock Solid Stage 3 1️⃣ Build Outside the Weakpoint During non-exposure phases: Apply steady DPS. Generate SP. Avoid spending full Ultimate. Preserve stamina. This phase is preparation, not aggression. 2️⃣ Anticipate the Jump Chrysopolis telegraphs its jump clearly. When it begins: Stop long animations. Reposition slightly behind anticipated landing. Preserve stamina for immediate rotation. Agony’s stamina reduction means poor timing leaves you unable to reach the rear core. 3️⃣ Rotate Behind Immediately The moment it lands: Sprint behind. Avoid frontal attacks. Do not waste damage into shield. Speed matters more than raw output. 4️⃣ Commit Full Burst This is not the time to hold back. Execute: Battle Skill Combo Skill Ultimate Reaction chains Avywenna should retrieve Thunderlances instantly.Laevatain should already have buffs stacked.Yvonne should fire from safe positioning without overextending. The goal is to delete the weakpoint before the exposure window ends. 5️⃣ Reset and Repeat After successful destruction: Chrysopolis is temporarily disabled. ATK buff avoided. Cycle resets. Return to preparation phase. ⚠ Agony Mode Survival Adjustments Agony makes stamina management the hidden mechanic. Key Rules Dodge only when necessary. Avoid sprinting excessively. Do not commit melee during tremor slams. Stay near rear-flank positioning to shorten sprint distance. If ATK buff triggers: Play defensively. Avoid burst attempts during high-damage slams. Wait for next jump cycle. One failed weakpoint phase can spiral quickly. 🧠 Advanced Tactical Insights Pre-Stack Before Exposure Do not enter weakpoint phase empty. Before jump: Ensure SP nearly full. Buffs active. Cooldowns aligned. Think two phases ahead. Camera Discipline Keep boss slightly off-center to: Track landing direction. Avoid losing rear alignment. Reduce reposition panic. Stamina Micro-Management Short bursts of movement > long sprints. Tap repositioning instead of holding. This keeps enough stamina for emergency dodge. 🎁 Stage Rewards Clearing Rock Solid Stage 3 grants: T-Creds ×24,000 Advanced Cognitive Carrier ×3 Mark of Perseverance ×1 Protohedron ×8 Arms INSP Set ×5 Agony retains identical rewards with far stricter execution requirements. 🗺 Blueprint: Clean Agony Clear Flow Phase 1 – Stabilize Sustain steady DPS. Build SP. Phase 2 – Jump Anticipation Preserve stamina. Align cooldowns. Phase 3 – Weakpoint Execution Sprint rear → Full burst chain → Destroy core. Phase 4 – Controlled Reset Avoid overcommitment. Prepare next cycle. Repeat until collapse. Operators pushing deeper into Monument rotations or perfecting Agony clears can strengthen their roster with secure Accounts, refine weakpoint execution through expert Hourly Services, or ensure consistent Stage 3 clears using reliable Boosting as Inorganic Construct difficulty escalates. Rock Solid doesn’t reward aggression. It rewards preparation. Every jump is a question. Every weakpoint is your answer. GameMarket.gg is a trusted digital marketplace for everything gaming-related. We serve the gaming community by providing secure access that enhances every gaming journey.
Arknights: Endfield
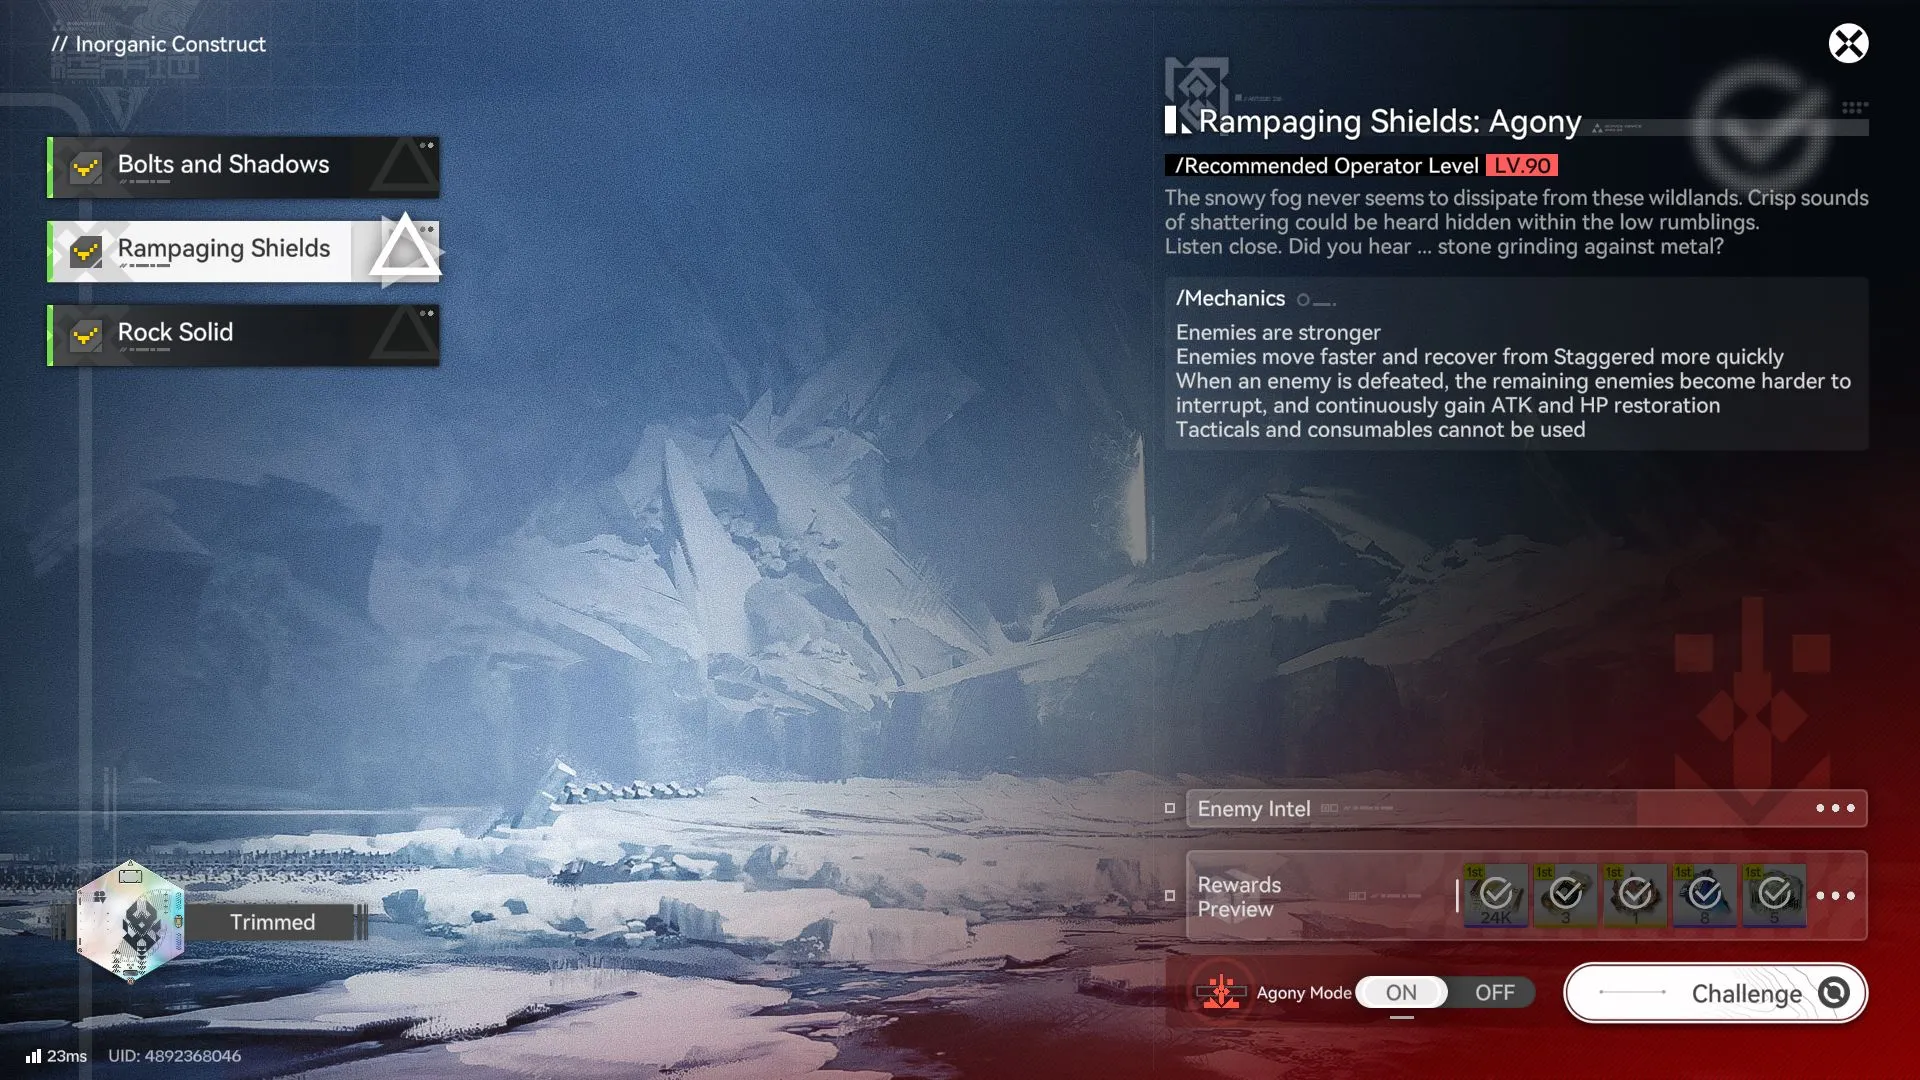
Endfield Rampaging Shields Guide – Twin Strategy
🛡️ Arknights Endfield Guide: Rampaging Shields Stage 2 This Guide dives deep into Rampaging Shields, Stage 2 of Inorganic Construct, breaking down Heavy Ram mechanics, twin-boss scaling pressure, stagger pacing, synchronized kill strategy, Agony mode dangers, and refined execution flow. Rampaging Shields feels deceptively simple at first. Two Heavy Rams roam a frozen battlefield, charging in brutal arcs and slamming through your frontline. But this stage isn’t about surviving individual hits—it’s about managing escalation. The moment one Ram falls, the remaining one transforms into a scaling threat that gains attack power, regeneration, and resistance to interruption. The encounter shifts from controlled pressure to runaway chaos in seconds if you mistime the finish. That shift changes how you approach the entire fight: it stops being about bursting and becomes a disciplined duel of tempo control. 🌫 Stage Overview Recommended Operator Level Normal: Lv. 60 Agony: Lv. 90 Core Mechanics Normal Mode Enemies are significantly stronger than standard Monument stages. Agony Mode Heavy Rams move faster. They recover from Stagger more quickly. After one Ram is defeated: The remaining Ram continuously gains ATK. Gains HP restoration. Becomes much harder to interrupt. Tacticals and consumables cannot be used. Agony doesn’t just increase numbers—it weaponizes poor timing. 🐏 Heavy Ram Behavior Analysis Heavy Rams are mobile bruisers with wide charge lanes and heavy knockback pressure. Combat Traits Moderate Physical resistance (C) Fast movement cycles Frequent charge attacks Strong interrupt resistance High stagger decay in Agony Unlike Bolts and Shadows, where immunity phases dictate tempo, Rampaging Shields revolves around spatial control and synchronized execution. ⚔️ Team Archetypes and Why They Work 🛠 Physical Control Core Endministrator / Chen Qianyu / Pogranichnik / Lifeng This composition dominates through layered crowd control. Endministrator immobilizes with Originium Crystals. Chen Qianyu chains Lift effects, disrupting charge momentum. Pogranichnik fuels SP economy for constant pressure. Lifeng applies Physical Susceptibility while contributing stagger. Because Rams are not immune to control, this team can “lock the arena,” preventing chaos from forming. ❄️ Yvonne Cryo Lockdown Team Yvonne / Last Rite / Fluorite / Xaihi Cryo excels here due to Solidification. Yvonne anchors single-target burst. Solidification halts charge patterns. Fluorite and Xaihi stack Cryo infliction. Sustained freeze windows reduce incoming damage. When Rams stop moving, the stage stabilizes instantly. ⚡ Avywenna Precision Burst Team Avywenna / Perlica / Gilberta / Arclight This team requires precision. Gilberta pulls and applies Lift. Perlica sets up Electric infliction. Avywenna pierces with Thunderlance bursts. Arclight supports SP regeneration. When positioning is correct, stagger windows stack rapidly and SP flows cleanly. 🎯 How to Beat Rampaging Shields 1️⃣ Establish Control Immediately The first 20 seconds determine the fight’s difficulty curve. If both Rams: Roam freely Overlap charges Force split positioning You lose tempo. Instead: Apply Lift early. Apply Solidification early. Group their positioning. Anchor the fight to one side of the arena. This creates predictable movement lanes. 2️⃣ Dodge With Intent, Not Panic Heavy Ram charges are: Wide Fast High damage Interrupt-capable Never cast long animations mid-charge. The safe rhythm:Control → Burst → Disengage → Dodge → Re-engage Greed causes spirals. 3️⃣ The Synchronized Kill Rule This is the defining mechanic. If one Ram dies too early in Agony: The other gains scaling ATK. Begins regenerating HP. Becomes harder to interrupt. Moves faster. Suddenly your stagger rhythm collapses. Correct Execution Flow Lower both Rams evenly. Switch targets every 10–15 seconds. Avoid committing Ultimates early. Track both HP bars carefully. When both drop below ~25%: Align cooldowns. Chain stagger. Execute synchronized burst. Finish within a single rotation window. Precision matters more than speed. 🔄 Stagger Management in Detail Agony reduces stagger duration—but not stagger application. Ways to maintain pressure: Final Strikes between rotations. Combo Skills during lift windows. Ultimates during partial stagger states. Status reactions layered consistently. Frequent small staggers are more valuable than rare full knockdowns. 🧠 Advanced Tactical Insights Arena Framing Fight near the mid-edge of the arena rather than center.This narrows charge angles and prevents split aggro. Cooldown Discipline Do not: Use both Ultimates on one Ram early. Blow SP on uneven HP bars. Chase a fleeing Ram while ignoring the other. Do: Sync burst. Save high-impact skills for final phase. Preserve SP before synchronized kill window. Managing Enrage Pressure If one Ram enrages: Prioritize stagger attempts. Interrupt regen windows. Maintain mobility. Avoid stationary burst. At this point, survival overtakes DPS. ⚠ Agony Mode Psychological Trap Agony tempts you to secure early kills because damage intake feels threatening. But: Early elimination = scaling disaster. Controlled pacing = safer long-term. Rampaging Shields is a patience test disguised as a DPS race. 🎁 Stage Rewards Clearing Rampaging Shields Stage 2 grants: T-Creds ×24,000 Advanced Cognitive Carrier ×3 Mark of Perseverance ×1 Protohedron ×8 Arms INSP Set ×5 Agony provides identical rewards with significantly higher execution demand. 🗺 Blueprint: Clean Agony Clear Flow Phase 1 – Stabilize Apply Lift or Solidification. Establish spacing. Phase 2 – Balanced Damage Alternate targets. Maintain HP parity. Phase 3 – Pre-Finish Setup Save cooldowns. Align SP. Position both Rams close. Phase 4 – Synchronized Burst Chain stagger → Combo → Ultimate → Finish both within one rotation. Operators pushing deeper into Monument rotations or refining Agony clears can reinforce their roster through trusted Accounts, improve rotation discipline with professional Hourly Services, or secure consistent clears using reliable Boosting as Inorganic Construct scaling intensifies. Rampaging Shields rewards restraint over aggression. Control both threats, dictate the rhythm, and the battlefield never spirals out of your hands. GameMarket.gg is a trusted digital marketplace for everything gaming-related. We serve the gaming community by providing secure access that enhances every gaming journey.
Arknights: Endfield
Endfield Guide: Bolts and Shadows Agony Breakdown
⚙️ Arknights Endfield Guide: Bolts and Shadows Stage 1 This Guide unpacks Bolts and Shadows, the opening stage of Inorganic Construct, with a full mechanical and tactical breakdown—covering Heavy Sting’s attack patterns, immunity cycles, Sting α spawn control, stagger discipline, and Agony mode survival. Bolts and Shadows doesn’t overwhelm you immediately. It tests patience. Heavy Sting controls the tempo of the battlefield, forcing you to earn every damage window instead of spamming cooldowns on demand. If you fight on its rhythm, the stage feels clean. If you rush into it, the battlefield turns chaotic fast. 🗺 Stage Context and Threat Landscape Recommended Level Normal: Lv. 60 Agony: Lv. 90 The battlefield echoes with old bombardment scars, but the real threat isn’t environmental—it’s mechanical control. Heavy Sting dictates positioning and timing, while Sting α exist to punish sloppy phase transitions. 🐝 Understanding Heavy Sting Heavy Sting is not just a damage sponge. It’s a phase-based controller. Core Behavior Wide attack arcs (greatly expanded in Agony) Frequent interrupt potential Periodic complete immunity Faster recovery from Stagger in Agony Unlike previous Monument fights where sustained DPS wins, this stage demands structured burst windows. 🔄 The Immunity Cycle – The Real Mechanic At intervals, Heavy Sting: Gains total immunity to all damage Spawns three Sting α across the field Until all three Sting α are defeated, the boss remains invulnerable. This is the stage’s central tension point. What This Means Burst must be reserved AoE tools become critical Camera control matters Target switching must be immediate The longer Sting α live, the longer the fight stretches—and in Agony, stretched fights are lethal. 👥 Best Team Archetypes 🛠 Physical Control Core Endministrator / Chen Qianyu / Pogranichnik / Lifeng This team thrives on stagger chaining and clean rotation flow. Endministrator anchors burst Chen enables combo chaining Pogranichnik stabilizes SP economy Lifeng applies Physical Susceptibility and extra stagger Best suited for players who prefer control over explosive AoE. 🔥 Laevatain Hypercarry Laevatain / Wulfgard / Akekuri / Ardelia This composition shines during immunity breaks. Laevatain deletes Sting α quickly Wulfgard accelerates Melting Flame stacks Akekuri fuels SP loops Ardelia sustains and applies debuffs This is the most consistent immunity-phase solution. ⚡ Avywenna Piercing Burst Avywenna / Perlica / Gilberta / Arclight Thunderlance pierces grouped enemies Gilberta tightens Sting α formation Arclight supplements damage + SP Strong stagger through combo chains A fluid team built around rhythm and spacing. ❄️ Last Rite Cryo Burst Last Rite / Fluorite / Ardelia / Xaihi Strong single-target pressure Cryo infliction stacking Wide Ultimate helps clean Sting α Requires tighter execution but rewards precision. 🎯 How to Beat Bolts and Shadows Stage 1 🛑 Step 1 – Respect Heavy Sting’s Attack Windows Heavy Sting’s attacks: Cover wide angles Interrupt skill animations Hit harder in Agony The correct rhythm is: Dodge → Wait for recovery frame → Commit skill Never open a long animation while it is mid-swing. ⚡ Step 2 – Time Burst Around Immunity Don’t unload everything early. If you overspend cooldowns: Immunity triggers Sting α spawn You lack AoE Phase drags Hold at least one strong AoE or Ultimate for add phase. 🐝 Step 3 – Eliminate Sting α Immediately When immunity activates: Rotate camera instantly Identify all three spawn points Group or reposition Execute AoE burst Sting α have balanced resistances and low durability, but hesitation compounds pressure. ⚖️ Step 4 – Maintain Stagger Pressure Agony increases: Stagger recovery speed Interrupt resistance But stagger is still achievable through: Final Strikes Combo Skills Ultimates Elemental reactions Stagger windows shorten immunity cycles indirectly. ⚠ Agony Mode Adjustments Agony introduces real positional danger. Key Differences Larger attack range Faster stagger recovery No consumable safety net Immunity becomes mandatory mechanic Survival Discipline Keep HP above 70% before immunity Don’t stand inside attack arcs Avoid greedy skill overlap Mistakes snowball faster here than in previous stages. 🧠 Advanced Execution Insights Camera Control Matters Because Sting α spawn opposite Heavy Sting, poor camera control wastes seconds. Pre-position slightly off-center to maintain awareness of both boss and spawn side. Rotation Planning Think in cycles: Phase 1: Stagger pressure Phase 2: Boss burst Phase 3: Immunity → Add clear Phase 4: Repeat Clean loops beat reckless aggression. Animation Discipline Avoid mid-cast interrupts by: Casting after attack recovery Staying mobile between bursts Canceling reposition animations quickly 🎁 Stage Rewards Clearing Bolts and Shadows Stage 1 grants: T-Creds ×24,000 Advanced Cognitive Carrier ×3 Mark of Perseverance ×1 Protohedron ×8 Arms INSP Set ×5 Agony maintains identical reward structure with higher execution demand. 🗺 Blueprint: Clean Clear Flow Step 1 Establish stagger rhythm without overcommitting burst. Step 2 Dodge consistently and avoid mid-cast interrupts. Step 3 Save AoE for Sting α immunity phase. Step 4 Delete Sting α instantly. Step 5 Unload burst during vulnerability window. Repeat until Heavy Sting falls. Operators aiming to stabilize Agony clears or optimize Inorganic Construct progression can strengthen their roster with verified Accounts, refine execution timing through expert Hourly Services, or secure consistent endgame clears using trusted Boosting as Monument rotations grow more demanding. Bolts and Shadows rewards patience. Fight on your terms—but only after you’ve survived its tempo. GameMarket.gg is a trusted digital marketplace for everything gaming-related. We serve the gaming community by providing secure access that enhances every gaming journey.
Arknights: Endfield
Avywenna Best Build & Teams in Version 1.0
⚡ Arknights Endfield Avywenna Build Guide Avywenna is an Electric hypercarry built around Thunderlance deployment and recall burst windows. She is not a passive damage dealer — she is a rotation-based spike DPS whose power depends entirely on Electric Infliction uptime, proper debuff layering, and correctly timed Thunderlance retrieval. Her design shifts gameplay toward structured burst execution: apply Electric → trigger Combo → deploy EX lance → recall at peak amplification. When optimized, she becomes one of the strongest Electric DPS units in Version 1.0. 📊 Character Overview Rarity: ★★★★★ Element: Electric Weapon: Polearm Class: Striker Scaling Stat: Will Tier: S Avywenna’s damage scales primarily from Will, with Agility improving combat flow. She performs best in dedicated Electric teams. 🛠️ Best Avywenna Build (Endgame DPS) 🥇 Best Weapon: JET Why it’s optimal: High Arts DMG increase Strong Will scaling ATK boost Maximizes Electric burst windows Essence Priority Suppression Attack Boost Main Attribute Boost Suppression improves consistency during stagger windows. Attack Boost and Will scaling amplify spear recall burst. 🧥 Best Endgame Gear: Bonekrusha Set Armor: Bonekrusha Poncho T1Gloves: Type 50 Yinglung Gloves T1Kits: Bonekrusha Figurine ×2 Set Benefits ATK +15% Combo Skill grants Bonekrushing Smash Bonekrushing Smash: +30% next Battle Skill DMG (stacks twice) This perfectly aligns with her rotation:Combo Skill → stacks buff → Thunderlance recall consumes buff for massive burst. 🌱 Early Game Alternative Weapon: Cohesive TractionGear: Aburrey’s Legacy Set Skill DMG +24% ATK stacking on skill use Electric DMG synergy Strong transitional setup before Bonekrusha is available. ⚔️ Complete Thunderlance Rotation Explained Core Loop: Apply Electric Infliction Trigger Combo Skill (spawn Thunderlances) Use Ultimate (spawn Thunderlance EX + Susceptibility) Use Battle Skill (recall all lances through enemies) Burst Optimization Conditions: 3+ Thunderlances active Electric Susceptibility applied Bonekrusha stacks active Enemy staggered Recalling early reduces damage significantly. 👥 Best Avywenna Team Comps Avywenna cannot function without Electric Infliction support. She requires enablers. 🔹 F2P Electric Team DPS: AvywennaSupport: AkekuriSupport: PerlicaSustain: Ardelia Why This Works: Perlica applies Electric Infliction and Electrification. Akekuri restores SP. Ardelia applies Corrosion and healing. Avywenna executes full spear burst. This team focuses on stable setup and safe execution. 🔹 Premium Electric Team Variants High SP Variant Avywenna / Arclight / Perlica / Akekuri High Damage Amp Variant Avywenna / Arclight / Perlica / Antal High CC Variant Avywenna / Arclight / Perlica / Gilberta Each variation modifies: SP economy Damage amplification Crowd control Electric Infliction uptime Core rule: Maintain consistent Electric application. 🔁 F2P Team Rotation (Detailed) Step 1 Use Avywenna Basic until Final Strike triggers: Ardelia Combo (Corrosion first) Perlica Combo (Electrification second) Step 2 Trigger Avywenna Combo → spawn Thunderlances. Step 3 Use Ardelia Battle Skill → increase Arts damage taken. Step 4 Perlica Battle Skill → apply Electric Infliction. Step 5 If staggered: Akekuri Combo → SP restore. Step 6 Avywenna Final Strike → Combo again → more lances. Step 7 Avywenna Ultimate → spawn Thunderlance EX. Step 8 Avywenna Battle Skill → recall all spears for burst. The recall must happen after all debuffs are active. 🔁 Electric Premium Rotation Opening: Perlica Battle Skill (Infliction) Avywenna Final Strike Trigger Perlica + Avy Combo Arclight + Gilberta Combo Apply Battle Skill debuffs Ultimate Order: Gilberta Ultimate (Corrosion + Susceptibility) Arclight Ultimate Perlica Ultimate Avywenna Ultimate Final Burst: Combo → Battle Skill recall This maximizes spear multiplier stacking. 🤝 Best Synergy Breakdown 🟡 Perlica (Core Enabler) Reliable Electric Infliction Electrification boosts Arts DMG Essential for rotation stability 🔵 Arclight Consumes Infliction stacks Excellent weapon synergy Benefits from Avy’s Susceptibility 🔴 Akekuri SP engine Link buff for spear recall burst Easier to pilot than Arclight 🟢 Antal Consistent Susceptibility Strong single-target amplifier Easy and stable support option 🟣 Gilberta Corrosion + large Susceptibility Massive burst window setup Excellent AoE control 🎯 Skill & Talent Priority Skills Battle Skill Combo Skill Ultimate Basic Attack Talents Tactful Approach (Electric Susceptibility) Expedited Delivery (Energy gain) 🧠 Advanced Optimization Tips Never recall with only 1 lance unless forced. Delay recall if Susceptibility isn’t active. Group enemies before recall. Position enemies in spear path. Stagger windows dramatically increase burst value. Avywenna rewards discipline and rotation timing. 🏆 Final Verdict Avywenna is a structured burst Electric hypercarry who scales exponentially with proper team support. In optimized Electric compositions, she delivers some of the strongest burst windows available in Version 1.0 content. If you’re optimizing your Electric lineup or accelerating progression, you can secure strong Accounts, improve efficiency with professional Hourly Services, or push difficult content through trusted Boosting. GameMarket.gg is a trusted digital marketplace for everything gaming-related. We serve the gaming community by providing secure access that enhances every gaming journey.
Arknights: Endfield
Ember Build Breakdown: Gear, Modules, and Team Picks for Top Damage in Endfield
Ember Build Guide — Burn Bright in Arknights: Endfield Ember is a 6★ Heat Defender built for team sustain + Physical-team support. She keeps runs stable by layering three things at once: Vulnerable stacks (for your damage window), HP Treatment (for the controlled operator), and team-wide shielding (to prevent a fight from collapsing when enemies spike). If your lineup wants consistent Vulnerable uptime without spending extra SP and you hate getting clipped during stagger resets, Ember is the “safe glue” pick. This kit changes how your team plays because Ember doesn’t just “save” mistakes—she creates a damage-friendly battlefield. Vulnerable stacking plus Knock Down control means your Physical DPS gets cleaner uptime, and that usually translates into faster clears with fewer panic rotations. Skill upgrade priority 1) Frontline Support (Combo Skill) — Highest Your most important button: heals the controlled operator and adds Vulnerable without spending SP. Leveling is real value because it improves the Will-scaling on her recovery. 2) Re-Ignited Oath (Ultimate) — High The teamwide shield is your “stability lever,” especially in high-damage encounters. Upgrading improves shield durability, so your team can keep pushing through pressure instead of backing off. 3) Forward March (Battle Skill) — Medium Mostly used for Vulnerable + Knock Down and stagger contribution. Damage scaling isn’t the goal, so you can leave this for later. 4) Sword Art of Assault (Basic) — Low Ember isn’t here to top the damage chart. Best weapons and Essence priority Ember scales best with Will (healing) and Max HP (shield strength). You’re looking for weapons that directly push those stats or improve Treatment/defensive utility. Best-in-slot Thunderberge (6★) Built for Ember’s identity: stronger shielding, plus extra controlled-operator shielding after combo-skill treatment. If you want the “I don’t die to random spikes” Ember, this is it. Recommended Essence (Thunderberge) Prioritize: Medicant → Max HP Boost → Strength Boost The point is to maximize the shield layer and keep her sustain reliable. Best alternatives Former Finery (6★) Great “sustain engine” option: Treatment Efficiency + reactive healing when a protected ally takes damage. Strong if your team is frequently trading hits. Finishing Call (5★) Very solid budget carry option: boosts combo-skill healing heavily. If you don’t have a 6★, this can still feel great for the core job. Industry 0.1 (4★) Early-game filler. It’s fine until your build stabilizes, but it’s not tailored to her sustain/shield job. Essence quick rules If your weapon supports treatment: prioritize its healing-related Essence first. If your weapon supports shields: prioritize Max HP and the relevant defensive trait first. Best gear sets Early game gearing Focus on HP, Will, Treatment Efficiency—anything that makes your healing and shield layers feel consistent. Endgame best set LYNX set (Best-in-slot) The cleanest sustain package: improves HP Treatment efficiency and adds extra defensive value to treated allies. Best when Ember is your “main safety net” in harder content. Alternate endgame option Eternal Xiranite Use this when LYNX is already locked to another operator or you want a more Protection-utility oriented setup. It’s the “team durability” alternative when you can’t run the ideal set. Stat priority Main focus Will (healing scaling) Max HP (Ultimate shield strength) Secondary Treatment Efficiency (raises the floor on sustain) Defensive utility (anything that keeps her alive and consistently applying support) What not to chase Pure damage stats. Ember’s value is control + sustain + Vulnerable uptime, not personal DPS. Best teams for Ember Ember performs best in Physical-focused comps that want: consistent Vulnerable stacks stable stagger/Knock Down control protection that lets DPS stay on the gas Team option 1 (balanced core) Endministrator (6★) + Lifeng (6★) + Ember (6★) + Chen Qianyu (5★)Why it works: strong baseline control and damage pacing, Ember keeps uptime clean with healing + shields while feeding Vulnerable windows. Team option 2 (accessible lead) Da Pan (5★) + Lifeng (6★) + Ember (6★) + Chen Qianyu (5★)Why it works: still keeps the Physical pressure plan, Ember stabilizes the frontline so your run doesn’t crumble when rotations get messy. Team option 3 (control-heavy) Endministrator (6★) + Pogranichnik (6★) + Ember (6★) + Chen Qianyu (5★)Why it works: high control and safe damage windows—great when enemy pressure is the main problem. Best Potentials (quick take) Most of Ember’s Potentials are “nice,” not mandatory—she’s already functional at base. P5 — The Steel Oath (★★★★ Very Good): the real spikeBigger Ultimate shield multiplier + a small ATK bump while shielded = best overall upgrade. P3 — Indomitable Front (★★ Low but useful)Helps in multi-target damage situations by giving some extra healing coverage. Everything else is mostly quality-of-life or small stat bumps. Why Ember Is a Must-Build A well-built Ember becomes a force of nature melting bosses, clearing mobs, and carrying squads through Endfield’s hardest content. She’s a top-tier pick for anyone looking to dominate event ladders and push late-game progression. Ready to build Ember without the grind? GameMarket.gg has your shortcut: explore Accounts with meta-ready Ember, book Hourly Services for rapid farming or event clears, or use Boosting to supercharge your Ember and squad for every challenge ahead. GameMarket.gg is a trusted digital marketplace for everything gaming-related. We serve the gaming community by providing secure access that enhances every gaming journey.
Arknights: Endfield
Arknights Endfield Guide: Survive the Gas Stage 1 Full Clear
🌫 Arknights Endfield Guide: Survive the Gas Stage 1 Deep Strategy This Guide breaks down Survive the Gas (Stage 1 of Those Forsaken by the Land) at a mechanical level—covering Mist scaling, healing math, wave pacing, interrupt timing, positioning, and how to prevent Siegeknuckles from snowballing the fight in both Normal and Agony Mode. Stage 1 isn’t a DPS check—it’s a pressure check. The Mist constantly drains HP, which means every second you spend inefficiently clearing waves compounds into real risk. Teams that clear slowly or mistime interrupts don’t lose instantly—they lose gradually, until one Charged Skill pushes them over the edge. 🗺 Stage Overview Recommended Levels Normal: Lv. 60 Agony: Lv. 90 Core Environmental Effect Constant Mist damage to all operators Mist damage increases as waves progress Healing on controlled operator distributes healing to team: 70% (Normal) 50% (Agony) Agony: No Tacticals or consumables allowed ⚙ Mist Mechanic: What It Actually Means The Mist is not burst damage—it’s attrition damage. That distinction matters. Mist Impact Over Time Early waves: manageable chip damage Mid-stage: noticeable HP decay during ability animations Final phase: Mist + boss burst overlap becomes lethal Healing Distribution Insight Healing the controlled operator spreads healing to teammates. This means: Your active character should be the one receiving consistent heals Swapping at low HP is risky because healing efficiency drops In Agony Mode, the 50% shared heal means you cannot “passively recover” teammates without active attention 👥 Team Breakdown and Tactical Roles 🔥 Laevatain Hypercarry (Most Consistent) Laevatain / Wulfgard / Akekuri / Ardelia Tactical Breakdown Laevatain: AoE wave deletion; reduces Mist exposure time Wulfgard: Enables faster Melting Flame stacking Akekuri: SP acceleration; critical for maintaining rotation tempo Ardelia: Primary sustain; applies Physical + Arts Susceptibility Why It’s Optimal Wave speed directly reduces Mist uptime. Laevatain’s AoE compresses early waves, making the entire stage safer. ⚡ Avywenna Premium Control Team Avywenna / Perlica / Gilberta / Ardelia Tactical Breakdown Gilberta: Enemy grouping specialist Avywenna: Piercing Battle Skill; maximizes grouped damage Perlica: Electric Infliction enables Combo triggers Ardelia: Sustain + vulnerability When to Use You are confident in skill timing You can consistently group early waves before they spread 🛠 F2P Physical Core Endministrator / Chen Qianyu / Akekuri / Ardelia Tactical Breakdown Chain Battle + Combo skills SP generation maintains pressure Relies heavily on Ardelia sustain Replacement Options Pogranichnik: SP support alternative Da Pan: Burst DPS substitute Lifeng: Pull + susceptibility (higher risk due to lower sustain) 🧟 Enemy Threat Analysis Most enemies have balanced resistances, meaning you don’t need strict elemental counters. Instead, you need clean wave control. 🛑 Primary Threat: Bonekrusher Siegeknuckles Why It’s Dangerous High burst damage Strong Charged Skill Can stagger and disrupt rotation Overlaps with Mist tick damage Charged Skill Response Options Battle Skill interrupt Combo Skill interrupt Perfect dodge Failure results in: Stagger HP drop during Mist tick Time loss 🎯 Wave-by-Wave Execution Plan Phase 1: Opening Waves (Enemies Spawn Spread Out) Objective: Collapse the formation quickly. Use grouping skills immediately Avoid chasing enemies individually Rotate AoE skills efficiently Minimize idle repositioning Mist Management Tip Every second spent repositioning instead of clearing increases cumulative Mist damage. Speed = survivability. Phase 2: Mid-Stage Pressure Mist damage becomes noticeable. Maintain healer uptime Avoid unnecessary swaps Keep SP generation stable Avoid overcommitting cooldowns This phase sets up your Siegeknuckles readiness. Phase 3: Siegeknuckles Encounter Priority Rules Hold interrupts specifically for Charged Skill Don’t dump cooldowns immediately Maintain healing through burst windows Avoid stagger chains Safe Rotation Pattern Bait Charged Skill Interrupt immediately Burst during recovery window Heal during downtime 🔥 Agony Mode Differences (Critical Adjustments) Agony removes consumables and reduces shared healing. What Changes You cannot panic-heal through items Healing efficiency is lower Positioning errors are more punishing Agony Survival Checklist Overvalue sustain Prioritize interruption consistency over damage greed Avoid HP trades Keep team above 60% HP before Siegeknuckles If two operators drop below 40% simultaneously, recovery is unlikely. 🧠 Advanced Optimization Tips Optimize Active Operator Keep your healer-friendly unit controlled to maximize shared healing. Don’t Overheal Excessive healing during low-pressure windows wastes cooldown timing for high-pressure moments. Manage Combo Timing Save burst skills for: Large grouped waves Siegeknuckles recovery window Positioning Matters Fighting in open space reduces stagger chaining from overlapping hits. 🎁 Rewards Overview Clearing Stage 1 (Normal or Agony) grants: T-Creds ×24,000 Advanced Cognitive Carrier ×3 Mark of Perseverance ×1 Protohedron ×8 Arms INSP Set ×5 Agony primarily increases difficulty prestige rather than changing loot. 🗺 Blueprint: Consistent Stage 1 Clear Step 1 — Build for Sustain Ardelia (or equivalent) is nearly mandatory. Step 2 — Compress Early Waves Faster wave clear = less Mist exposure. Step 3 — Preserve Cooldowns Don’t enter Siegeknuckles phase with nothing available. Step 4 — Interrupt Reliably Charged Skill failure is the most common wipe cause. Step 5 — Stabilize Before Finishing Don’t greed final damage if Mist has chipped your team low. Players aiming to stabilize Agony clears can strengthen their roster with optimized Accounts, refine timing and rotation precision through expert Hourly Services, or push Umbral Monument progression with trusted Boosting to secure seasonal milestones efficiently. Survive the Gas may be Stage 1—but it establishes the rule that defines the entire series: control the pressure, or the pressure controls you. GameMarket.gg is a trusted digital marketplace for everything gaming-related. We serve the gaming community by providing secure access that enhances every gaming journey.
Arknights: Endfield
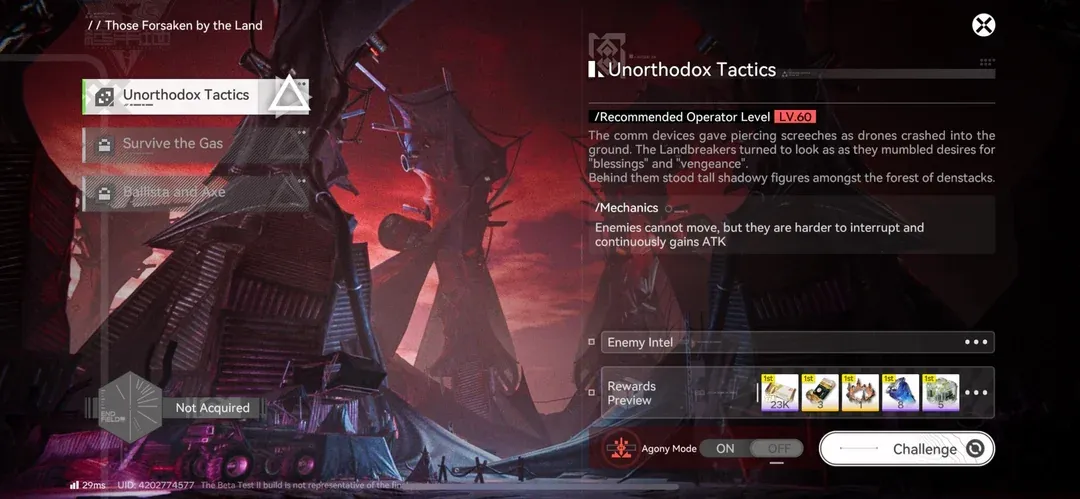
Endfield Guide: Stage 2 Agony Clear Strategy
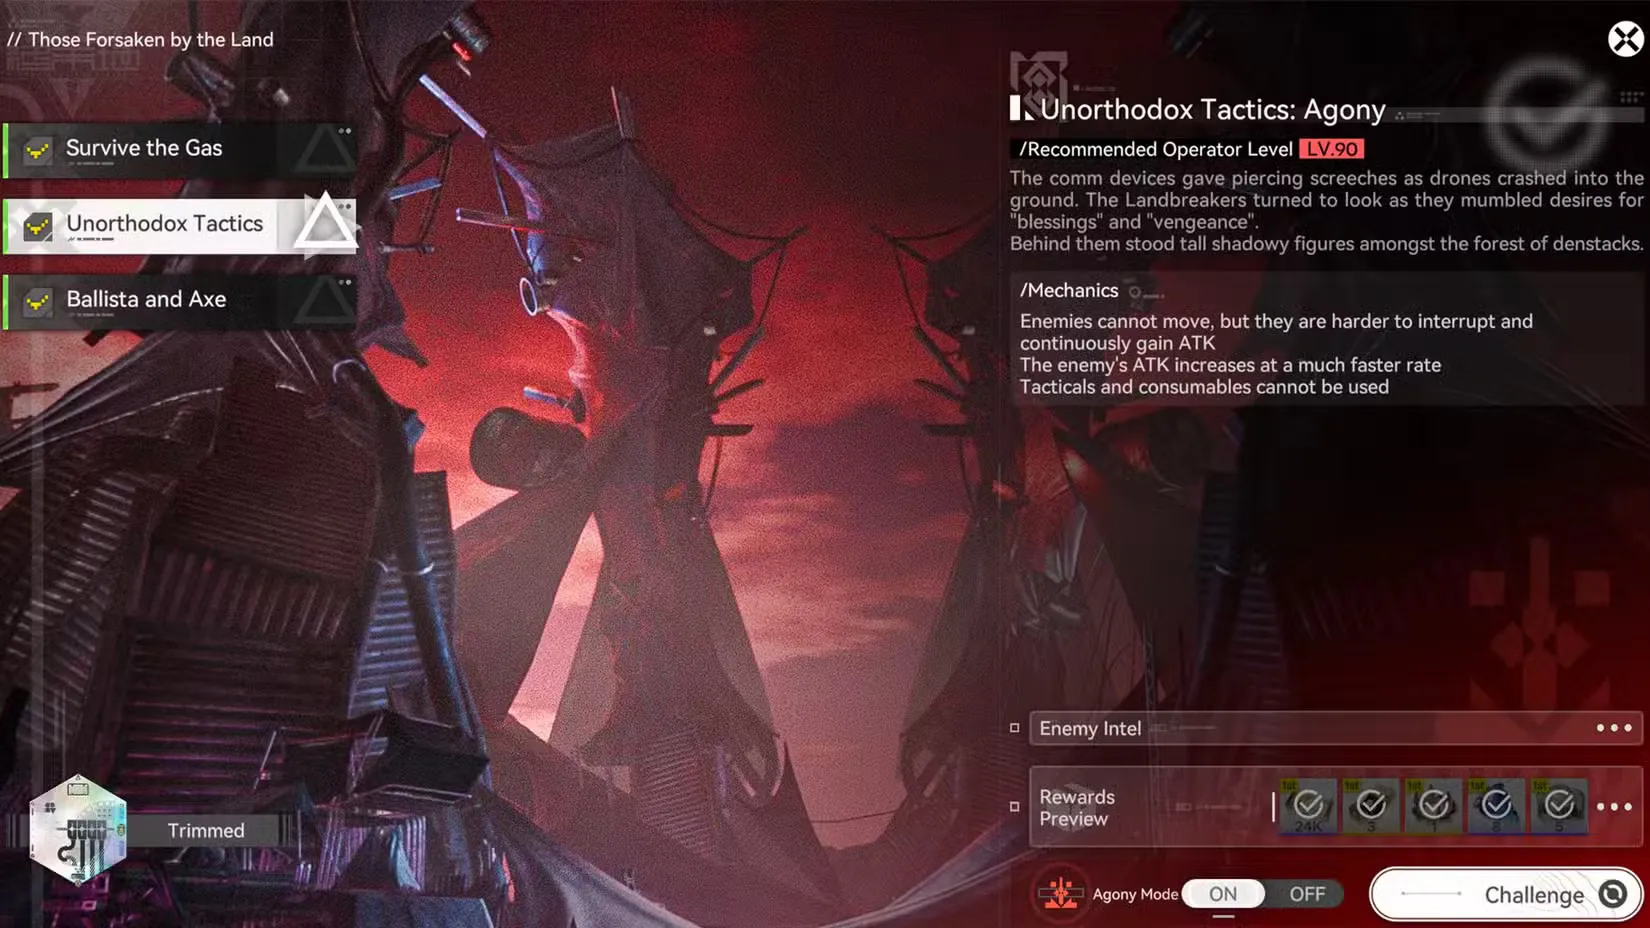
⚔️ Arknights Endfield Guide: Unorthodox Tactics Stage 2 This Guide breaks down Unorthodox Tactics (Stage 2 of Those Forsaken by the Land) at a mechanical level—covering the immobile enemy mechanic, ATK scaling pressure, stagger control, mitigation planning, and optimal wave compression for both Normal and Agony Mode. Stage 2 flips the formula from Stage 1. Instead of environmental pressure, this fight creates damage escalation pressure. Enemies don’t chase you—but the longer they live, the stronger they become. This transforms Stage 2 into a time-sensitive damage race where inefficient clears don’t feel dangerous at first… until a buffed enemy suddenly deletes your frontline. 🗺 Stage Overview Recommended Levels Normal: Lv. 60 Agony: Lv. 90 Core Mechanics Normal Mode Enemies cannot move Enemies are harder to interrupt Enemies continuously gain ATK Agony Mode ATK increases much faster No Tacticals or consumables allowed This stage is not about survival over time. It is about preventing exponential scaling. 🧠 Understanding the ATK Scaling Mechanic Enemies gain ATK continuously. What This Means in Practice Early phase damage feels low Mid-phase begins to spike noticeably Late phase becomes lethal if enemies remain alive too long In Agony Mode, the scaling curve is steeper. A delay of even 10–15 seconds can turn survivable damage into wipe-level burst. This stage rewards front-loaded damage and clean AoE execution over slow, defensive play. 👥 Enemy Threat Analysis 🧟 Bonekrusher Ambusher / Elite Ambusher Standard scaling threats Dangerous only if left alive too long Primary targets for early AoE bursts 🐍 Tunneling Nidwyrm (Primary Threat) Why it matters: Higher toughness Gains ATK like all enemies Becomes extremely dangerous if not burst quickly Harder to interrupt due to stage modifier This enemy determines whether the run stabilizes or collapses. 🔥 Best Team Archetypes 🌋 Laevatain Hypercarry (Most Reliable) Laevatain / Wulfgard / Akekuri / Ardelia Why It Dominates Stage 2 Enemies are immobile → perfect for AoE Laevatain Ultimate hits entire formation Melting Flame stacking accelerates burst timing Akekuri ensures consistent SP cycling Ardelia stabilizes damage intake This team reduces enemy uptime, which directly reduces scaling risk. ⚡ Avywenna Premium Control Team Avywenna / Perlica / Gilberta / Ardelia Strengths Thunderlance pierces stacked enemies Gilberta grouping compresses hitboxes High stagger potential enables Finishers Strong SP generation through stagger cycles Because enemies are stationary, Thunderlance pathing becomes extremely efficient. 🛠 F2P Physical Core Endministrator / Chen Qianyu / Akekuri / Ardelia Tactical Focus Chain Combo Skills rapidly Prioritize Nidwyrm burst windows Maintain SP economy Avoid prolonged fights Replacement Options Da Pan: Strong burst and Lift utility Lifeng: Grouping utility (riskier without sustain) 🎯 How to Beat Unorthodox Tactics Stage 2 1️⃣ Use AoE Aggressively Since enemies cannot move: Every AoE has maximum efficiency Positioning mistakes are minimal You should aim to hit all enemies at once Single-target focused rotations are inefficient here. 2️⃣ Group Even Closer for Burst Compression Although enemies are already near each other: Gilberta’s pull tightens hitbox overlap Lifeng’s Ultimate compresses formation Tighter clustering = better burst efficiency This shortens fight duration and limits ATK scaling. 3️⃣ Kill Priority Order Elite Ambushers Remaining Ambushers Nidwyrm (focus when burst window ready) Do not split damage randomly. 4️⃣ Damage Mitigation Is Mandatory Even with strong DPS, scaling damage will eventually hit. Bring: Shields Healing Defensive buffs Susceptibility debuffs to shorten fight Ardelia remains the safest sustain pick because she: Heals reliably Applies Physical & Arts Susceptibility Maintains tempo ⚠ Agony Mode Adjustments Agony increases scaling speed and removes consumables. Key Adjustments Burst earlier Avoid defensive stalls Hold interrupts for Nidwyrm Keep team above 70% HP entering final wave If enemies reach high ATK stacks, recovery becomes unlikely. 🧩 Advanced Optimization Stagger Cycling Because enemies are harder to interrupt: Stack stagger damage early Trigger Finishers for SP Chain burst windows efficiently Cooldown Planning Do not waste Ultimate on first weak wave if: It delays Nidwyrm burst It leaves you exposed during scaling window Time Efficiency Rule Every second saved early prevents compounded scaling later. Stage 2 punishes hesitation. 🗺 Blueprint: Consistent Stage 2 Clear Step 1 — Select AoE-Focused DPS Laevatain or Avywenna preferred. Step 2 — Compress Enemy Formation Group tightly before major burst. Step 3 — Frontload Damage Don’t let scaling stack. Step 4 — Interrupt High-Risk Skills Especially Nidwyrm. Step 5 — Stabilize and Finish Cleanly Avoid greedy finishers at low HP. 🎁 Stage 2 Rewards Clearing Stage 2 (Normal or Agony) grants: T-Creds ×24,000 Advanced Cognitive Carrier ×3 Mark of Perseverance ×1 Protohedron ×8 Arms INSP Set ×5 Agony provides the same base rewards with higher execution prestige. Players looking to optimize clears for Unorthodox Tactics can strengthen their lineup with verified Accounts, refine execution timing through expert Hourly Services, or secure seasonal progression milestones via trusted Boosting to stay ahead in Umbral Monument rotations. Stage 2 isn’t about surviving pressure—it’s about preventing it from ever building. GameMarket.gg is a trusted digital marketplace for everything gaming-related. We serve the gaming community by providing secure access that enhances every gaming journey.
Arknights: Endfield
Arknights Endfield Guide: Stage 3 Boss Breakdown
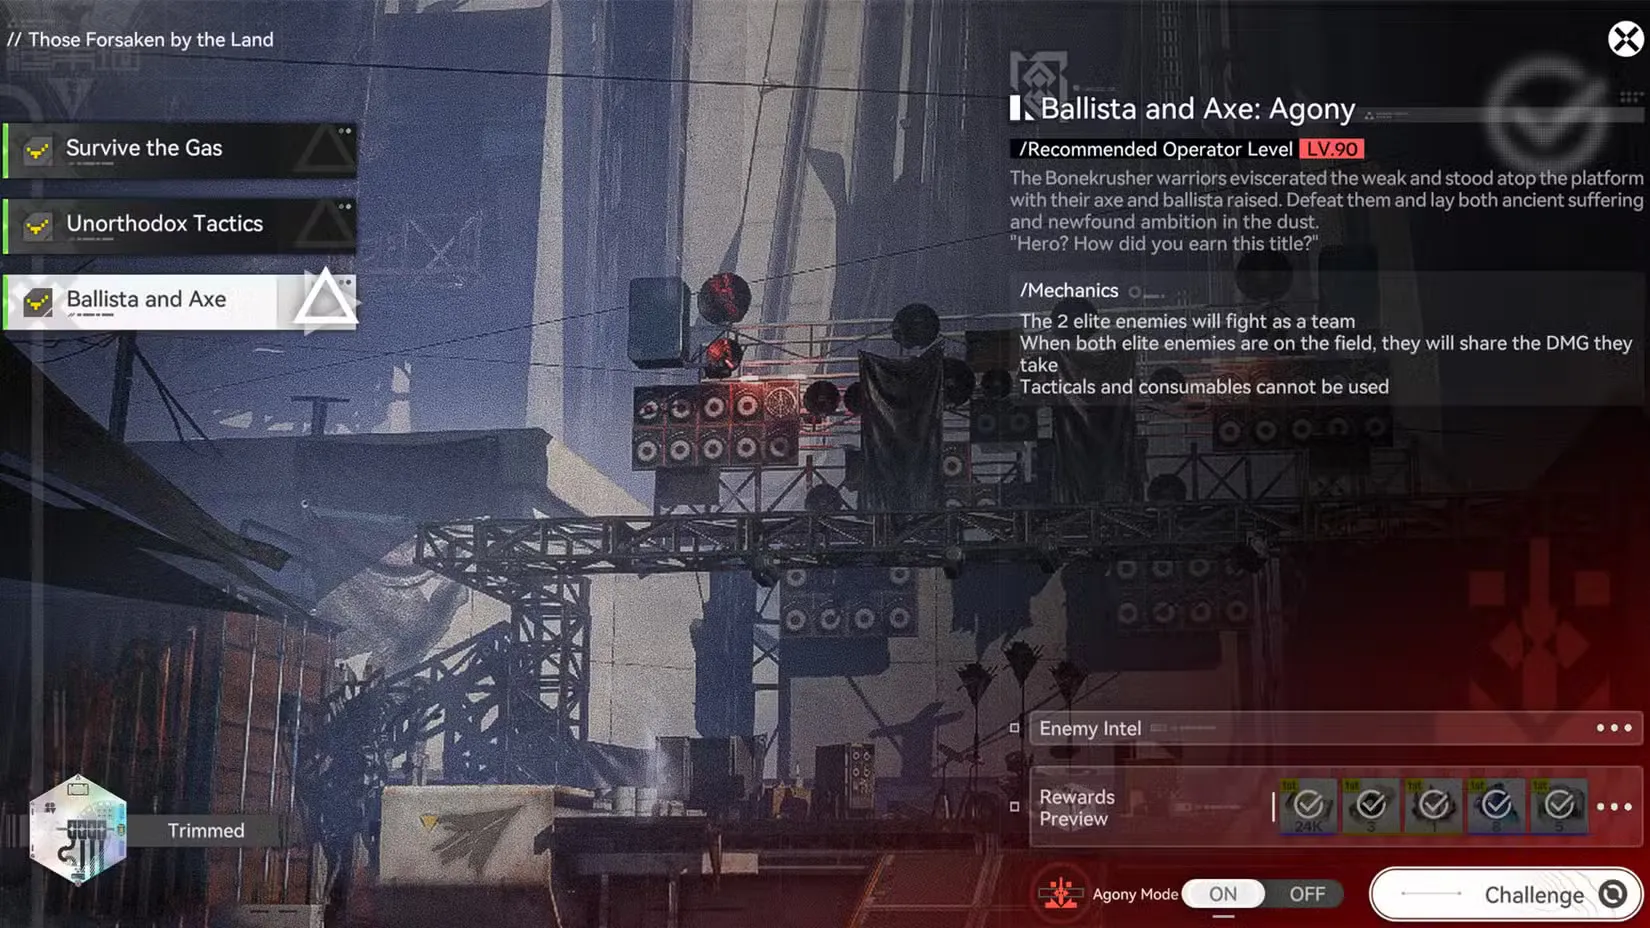
⚔️ Arknights Endfield Guide: Ballista and Axe Stage 3 This Guide breaks down Ballista and Axe (Stage 3 of Those Forsaken by the Land), covering elite coordination mechanics, shared HP pressure in Agony Mode, interrupt priorities, positioning control, and optimal burst timing for consistent clears. Stage 3 shifts from scaling pressure (Stage 2) into coordination pressure. You’re no longer racing enemies that grow stronger—you’re fighting two elites that demand spatial awareness, interrupt discipline, and synchronized damage windows. In Agony Mode, where both elites share damage taken, the fight becomes less about target focus and more about AoE efficiency and boss alignment control. 🗺 Stage Overview Recommended Levels Normal: Lv. 60 Agony: Lv. 90 Core Mechanics Normal Mode Two elite enemies fight simultaneously Agony Mode When both elites are active, they share damage taken Tacticals and consumables disabled This transforms Phase 3 into a positioning and burst synchronization check. 👥 Enemy Breakdown 🪓 Bonekrusher Executioner Close-range bruiser Grab mechanic Jump reposition tool High stagger susceptibility 🏹 Bonekrusher Ballista Ranged artillery threat Arrow Rain AoE denial Ground DoT arrows Forces repositioning These enemies complement each other: Ballista zones space Executioner punishes poor positioning 🧠 Understanding the Shared Damage Mechanic (Agony) When both elites are on the field: Damage dealt to one applies to both AoE becomes extremely valuable Poor positioning reduces total DPS efficiency This mechanic rewards: Tight boss stacking Wide-area burst skills Coordinated Ultimate timing It punishes: Split focus Off-screen boss control Random positioning 🔥 Best Team Archetypes 🌋 Laevatain Heat Hypercarry (Most Stable Clear) Laevatain / Akekuri / Wulfgard / Ardelia Why It Excels Wide AoE hits both elites Strong burst during overlap windows Consistent SP generation Excellent sustain In Agony Mode, Laevatain’s AoE pressure maximizes shared HP efficiency. ⚔ Physical Stagger Control Team Endministrator / Pogranichnik / Chen Qianyu / Ardelia Strengths Strong stagger uptime Multiple interrupt windows Consistent burst chains Safe rotational structure Stagger chaining becomes extremely valuable in Phase 3. 🛠 F2P Core Endministrator / Akekuri / Chen Qianyu / Ardelia Key Requirement Proper boss alignment before Ultimates. Without alignment: AoE loses shared HP efficiency Ballista may fire off-screen Executioner may interrupt burst 🧩 Phase-by-Phase Strategy 🏹 Phase 1 – Ballista Setup Bait Arrows Away Before the Executioner joins: Move away from center Force Ballista arrows to land off main combat area Prevent persistent ground DoT zones in center Poor early arrow placement complicates later phases. 🪓 Phase 2 – Executioner Control Avoid the Grab When arm lifts: Move immediately If too late → dodge on red eye flash If grabbed: Interrupt immediately with Battle Skill, Combo Skill, or Ultimate Progress stagger bar while freeing ally Grab mismanagement wastes DPS windows. 🌩 Phase 3 – Dual Elite Control (Core Difficulty) This is the real fight. 1️⃣ Keep Both Elites in Frame If one goes off-screen: You lose visual cues Arrow Rain may go un-interrupted Jump attacks may break combos Maintain lateral positioning. 2️⃣ Prioritize the Ballista Why? Arrow Rain creates persistent DoT field Zoning ruins alignment Harder to control when distant Executioner naturally jumps toward you.Ballista must be actively managed. 3️⃣ Stack the Bosses Let Executioner jump toward Ballista.Then: Activate AoE Ultimate Trigger Combo chains Maximize shared HP efficiency If separated: Delay burst Reposition first ⚠ Key Interrupt Priorities 🔴 Highest Priority: Arrow Rain Red circle indicator → immediate interrupt. If not interrupted: Persistent DoT field Space denial Increased pressure 🟠 Secondary: Executioner Grab Interrupt: To free ally To progress stagger To preserve tempo 🛡 Survival Optimization Because Agony removes consumables: Bring: Reliable healing (Ardelia preferred) Shield or mitigation tools Strong stagger options Avoid: Overcommitting during low HP windows Casting Ultimates without boss overlap 🎯 Advanced Optimization Boss Alignment Rule Before using Ultimate: Both elites within AoE radius Ballista visible Executioner not mid-jump Stagger Cycling Physical teams can: Chain stagger windows Lock elites in burst rotations Prevent dangerous casts Field Awareness Arrow remnants remain.Track safe zones. 🗺 Blueprint: Consistent Stage 3 Clear Step 1 — Control Early Arrow Placement Bait Ballista away from center. Step 2 — Manage Grab Discipline Interrupt or dodge cleanly. Step 3 — Enter Phase 3 With Full Resources SP stocked. Ultimates ready. Step 4 — Stack Bosses Force alignment before burst. Step 5 — Prioritize Ballista Maintain vision. Interrupt Arrow Rain. Step 6 — AoE During Shared HP Window Maximize dual damage efficiency. 🎁 Stage 3 Rewards Clearing Ballista and Axe (Normal or Agony) grants: T-Creds ×24,000 Advanced Cognitive Carrier ×3 Mark of Perseverance ×1 Protohedron ×8 Arms INSP Set ×5 Agony completion secures prestige and full seasonal progress. Players preparing to master Ballista and Axe can strengthen their roster through optimized Accounts, sharpen execution timing with expert Hourly Services, or secure flawless Agony clears using trusted Boosting to stay competitive in Umbral Monument rotations. Stage 3 doesn’t test raw damage—it tests control. Stack the bosses, manage interrupts, and the shared HP pool will collapse faster than either elite alone. GameMarket.gg is a trusted digital marketplace for everything gaming-related. We serve the gaming community by providing secure access that enhances every gaming journey.

Arknights: Endfield
Master Healing in Arknights: Endfield Item Guide, Team Tips, and Build Tricks!
Arknights: Endfield Best Healing Items Guide As Arknights: Endfield shifts away from traditional healer-centric team structures, survival is now defined by item management, trigger conditions, and operator role assignment. Healing items are no longer emergency backups — they are a core system that determines how forgiving your team composition can be, especially in prolonged or high-pressure encounters. Understanding how instant healing, continuous regeneration, and special regional plants interact is essential for stabilizing combat and avoiding unnecessary operator losses. Controlled Operator — Best Healing Item Setup Recommended Item: Yazhen Spray [L] High total healing output Triggers at low HP Can activate multiple times per fight The Controlled Operator consistently takes the heaviest frontline pressure. Because of this, continuous healing items with repeatable triggers are the best-in-slot choice. Yazhen Spray [L] provides steady regeneration after sustained damage, greatly reducing the risk of a run collapsing due to chained mistakes or sudden burst damage. Slow-recovery effects excel here because they stabilize HP over time rather than relying on a single emergency proc. Other Operators — Healing Item Distribution Recommended Setup One operator carries an instant-heal item Remaining slots are filled flexibly based on team needs One survivable operator should carry a revival item (Arts Tube or Arts Vial) Since Other Operators face significantly lower survival pressure, overloading them with healing items is inefficient. Concentrating strong healing tools on the Controlled Operator results in better resource efficiency and higher fault tolerance overall. Special Plants and Advanced Healing Mechanics Certain regional plants produce enhanced healing powders that outperform standard variants and become essential in mid- to late-game content. Valley IV Special Plants Firebuckle Umbraline Wuling Region Special Plants Fluffed Jincao Thorny Yazhen These special plants provide higher raw healing values and, more importantly, fixed-percentage HP recovery, making them far more reliable in high-difficulty encounters where flat values fall off. Instant Healing vs Continuous Healing Effects Instant Healing Items Restore 20% Max HP instantly Trigger only once per battle Heal only the holder and the Controlled Operator Examples: Firebuckle Powder Fluffed Jincao Powder Instant healing acts as a one-time emergency safety net, designed to prevent instant defeats. It is not intended to sustain long fights and should not be stacked across multiple operators. Continuous Healing Items Restore 30% Max HP over time Can heal any team member Can trigger repeatedly when conditions are met Examples: Citromix Thorny Yazhen Powder Continuous regeneration is the true backbone of Endfield’s healing system. These items support the entire team and are especially critical for the Controlled Operator, who takes frequent damage. Healing Item Carry Rules Each operator can carry only one tactical item Most healing items have a maximum of 3 uses Healing items cannot be resupplied mid-combat These restrictions further reinforce why repeatable, team-wide regeneration is superior to single-use emergency effects. How to Obtain Special Healing Plants Map Gathering (Early Game) Near Originium Byproduct Processing Center Firebuckle Umbraline Respawn: 10–20 minutes Wuling Region Fluffed Jincao: near teleport points Thorny Yazhen: around the main base Many plants are clustered close to the main base and can be accessed after clearing Blight using Liquid Xiranite. Planting — The Core Mid-Game Solution While gathering works early, planting becomes the primary long-term source of healing materials. Unlock farmland near Wuling base through early quests Purchase seeds with Wuling Stock Bills if needed Craft seeds and plant them via the Crafting system Special plants can also be obtained through planting. For example, harvesting Jincao Fields can yield Fluffed Jincao in addition to standard crops. Efficient farmland layouts dramatically reduce healing item shortages later in the game. Crafting Healing Items If special healing recipes are not visible: Open the Crafting Manual in the Crafting interface Gather and process plants to gain crafting experience Unlock advanced healing item recipes naturally through use Once unlocked, crafting becomes the most reliable way to maintain a stable healing inventory. Best Healing Item Setup Summary Controlled Operator Yazhen Spray [L] (Continuous Healing) Other Operators Flexible healing powders (Fluffed Jincao or Firebuckle) One survivable operator carries Arts Tube or Arts Vial This setup delivers the best balance of healing efficiency, cost control, and mistake tolerance, making it the optimal solution for the current version of Arknights: Endfield. Want a squad that can tackle anything Endfield throws your way? GameMarket.gg has your back grab Accounts prepped with meta teams, use Hourly Services for live strategy sessions and clears, or try Boosting to push through the game’s toughest healing tests with ease. As Endfield’s combat leans further into preparation-driven survival, mastering healing items is no longer optional — it’s the difference between controlled victories and sudden wipes. GameMarket.gg is a trusted digital marketplace for everything gaming-related. We serve the gaming community by providing secure access that enhances every gaming journey.

Arknights: Endfield
Best Gilberta build in Arknights: Endfield: gear sets, essences, play tips
Gilberta Build Guide Overview This build is all about turning Gilberta into a “team accelerator” that ramps your squad’s damage windows through fast ult access, reliable debuff/utility application, and buff carryover—so your whole lineup starts playing like it’s permanently in the middle of a clean, optimized burst cycle instead of waiting for cooldowns to line up. Gilberta’s most consistent value comes from stacking Ultimate Gain Efficiency and pairing it with weapon essences that reward her for applying key status effects (especially Lifted / Nature Infliction), letting her feed damage uptime without needing extended on-field time. Best Gilberta Build (Support) What you’re aiming to do Trigger your team buffs by applying Lifted / Nature Infliction through skills and combos Cycle Ultimate faster to keep your tempo high and your utility online Buff the squad’s Arts damage windows while staying flexible for mixed-element teams Best Weapon (and Why) 1) Delivery Guaranteed (Best-in-slot Support weapon) Essence Priority Pursuit Nature DMG Dealt +44.8% After combo skill applies Lifted, the team gains Arts DMG Dealt +28.0% for 15s Bonus Arts DMG Dealt +5.6% per Lifted enemy (up to 22.4%) Ultimate Gain Boost Ultimate Gain Efficiency +46.4% Will Boost Will +156 How it plays: This weapon is “the whole plan in one item.” You’re rewarded for doing the thing Gilberta already wants to do (apply Lifted), and the payoff is a clean teamwide Arts damage push that scales with how many targets you tag. 2) Opus: Etch Figure (Strong alternative) Essence Priority Suppression ATK +19.6% When battle skill applies Nature Infliction, the team gains Arts DMG Dealt +14.0% for 15s Bonus Arts DMG Dealt +5.6% per affected enemy (up to 16.8%) Nature DMG Boost Nature DMG Dealt +43.3% Will Boost How it plays: Slightly less explosive than Delivery Guaranteed, but very stable in content where you can consistently spread Nature Infliction. Best Early-Game Weapons 1) Stanza of Memorials (Best early progression pickup) Essence Priority Twilight Max HP +28.0% When you cast Ultimate, operators with different elements gain ATK +22.4% for 20s Intellect Boost Intellect +124 Attack Boost Attack +31.2% Why it’s good early: It rewards “press Ultimate on cooldown” play and naturally supports mixed-element squads while you’re still building your roster. 2) Fluorescent Roc (Simple fallback) Built around straightforward ATK boosts after skills hit, plus Will support. Best Gear Setup (Support) Best Armor Tide Fall Light Armor Key bonus: Ultimate Gain Efficiency +12.3% Helps you hit the “my Ultimate is always ready” feel faster. Best Gloves Eternal Xiranite Gloves (T1) Key bonus: Ultimate Gain Efficiency +20.5% Big efficiency spike that smooths every rotation. Best Kit Pieces Eternal Xiranite Auxiliary Arm (Kit I and II) Key bonus: Ultimate Gain Efficiency +24.6% Best Gear Set Eternal Xiranite (Set Bonus) Wearer HP +1000 After you apply Amp / Protected / Susceptibility / Weakened, teammates gain DMG Dealt +16% for 15s (does not stack) Why this set matters: It converts Gilberta’s “support actions” into real damage output for the entire team. You’re not just surviving longer—you’re turning utility into a timed team steroid. Stat & Essence Priorities Core stat focus (in plain terms) Ultimate Gain Efficiency first (your entire job is cycling value) Will / Intellect as your scaling backbone (depending on your kit scaling and team needs) Defensive padding only as needed (you’re here to enable, not tank forever) Essence upgrades that pay off fastest Anything that: Improves Ultimate Gain Rewards applying Lifted or Nature Infliction Adds teamwide damage windows rather than selfish scaling Teams That Fit Gilberta Best 1) Arts-leaning burst teams (best match) If your main damage dealers care about Arts damage windows, Gilberta becomes the “starter pistol” that tells the whole team when to sprint. Your plan: Open by applying your status/utility → trigger team damage buff → cash in with your main DPS burst → rotate while Gilberta rebuilds Ultimate again. 2) Multi-target / wave-heavy comps Weapons like Delivery Guaranteed scale harder when multiple enemies get tagged (more Lifted targets = more team damage bonus). If you’re farming or doing content with frequent packs, her value spikes. 3) Mixed-element squads (early-to-mid game) Early weapon options like Stanza of Memorials reward mixed elements directly after Ultimate, which is perfect while you’re still filling roster gaps. How to Play Gilberta in Real Fights Rotation mindset (what you’re actually doing) Enter, apply your key effect (Lifted / Nature Infliction / debuff) Trigger the team window (Arts DMG / DMG Dealt buffs) Get out and let your carries spend the window Return on time to refresh utility and build Ultimate again Practical habits that improve results Treat Gilberta as a timer setter, not a damage dealer. Prioritize actions that apply a status over extra on-field hits. In multi-target fights, position and timing matter: tagging more enemies before the burst window pays off immediately. Build Blueprint “Copy this and go” checklist Weapon: Delivery Guaranteed (or Opus: Etch Figure) Essence priority: Team-buff essence → Ultimate Gain → Will/secondary stat Armor: Tide Fall Light Armor Gloves: Eternal Xiranite Gloves (T1) Kits: Eternal Xiranite Auxiliary Arm (both slots if available) Set: Eternal Xiranite Gameplay: Apply effect → trigger team buff window → swap to carry → repeat Players refining Gilberta’s build and team efficiency can start with trusted Accounts to secure strong early rosters, book expert Hourly Services for build optimization and rotation coaching, or rely on professional Boosting to push progression and unlock high-end content faster without disrupting gameplay flow. With Endfield’s build depth placing more pressure on correct stat tuning and team synergy, having flexible progression options can make experimentation far less punishing. GameMarket.gg is a trusted digital marketplace for everything gaming-related. We serve the gaming community by providing secure access that enhances every gaming journey.
Arknights: Endfield
How to Build Yvonne in Arknights Endfield — Best Loadouts & Roles
🌌 Arknights: Endfield Spotlight — Yvonne’s Build, Best Gear, and Team Synergy In Arknights: Endfield, few units bridge damage output with battlefield utility as smoothly as Yvonne. Whether you’re progressing through early story content or optimizing for harder post-unlock content, Yvonne’s kit rewards smart positioning, gear prioritization, and tactical combos rather than raw stat stacking. This makes her one of the most practical and versatile operators in the current roster meta. Meaning-shift: Instead of seeing Yvonne as just another damage dealer with a gimmick, Endfield’s latest exploration of her build shows she functions like a turning point unit—one that stabilizes weak rotations and amplifies team pressure without requiring perfect optimization. ⚔️ Combat Identity — DPS With Control and Sustain Yvonne shines because her design isn’t a one-dimensional strike tool. She brings three core values to any team composition: Consistent damage that scales smoothly with progression Built-in control elements that improve team rhythm Sustain bridges that help clutch out messy engagements Unlike pure DPS units that rely on perfect windows, Yvonne grinds reliably even when resource timing gets imperfect. 🗡️ Weapon Priority — What to Equip First Choosing the right weapon for Yvonne is about supporting her all-round utility rather than maxing one stat. 🥇 Top Tier Choice Balanced Assault Weapons — boosts baseline damage while retaining control utility, helping Yvonne stay effective in any rotation. 🥈 Alternate Choice Critical Burst Weapons — ramps her damage during openings while still providing minor sustain or cooldown relief. 🥉 Situational Picks Weapons focused on: AOE pressure (useful in mob-heavy stages) Energy recovery (helps in extended fights) The goal is to keep her doing damage without long downtime, and weapon selection should support that rhythm. 🛡️ Best Gear Sets — Boosts That Matter Most Yvonne’s gear choices revolve around a few core stats that make her kit feel stronger in practice: 🔹 Set A: Balanced Offense Prioritize sets that boost: damage output consistency over burst spikes survivability to keep her online longer This build feels smooth across most content. 🔸 Set B: Control + Sustain Focus gear on: slowing enemies or applying pressure effects maintaining uptime across phases resisting burst damage from elites This set excels in longer fights where control matters more than single-rotation burst. ✨ Set C: Tempo Reinforcement If you need Yvonne to anchor faster runs: cooldown reduction resource generation faster abilities This increases her uptime in rapid clears. The best set for you often depends on your broader team composition, not just Yvonne’s isolated numbers. 🎯 Team Synergy — Who Yvonne Works Best With Yvonne isn’t a solo carry—she’s a team amplifier. Pair her with units that either: trigger off her control effects, or fill roles she doesn’t, like pure support or barrier strength Here are three strong synergy paths: 🤝 Burst Companion Teams Yvonne anchors your damage while burst units like fast strike carriers or spike assassins maximize peak output windows. 🛡 Control + Stability Builds Pair her with: shield or barrier units stuns or crowd control tempo buffers This makes the whole squad resilient in tougher rotations. 🌀 Hybrid Flex Teams Yvonne plays well with teams that mix damage types, allowing her reliable work while others fill specialized roles like debuffing or aggressive zoning. The key is balance: Yvonne’s damage + sustain unlocks broader utility for others. 🧠 Tactical Playstyle — Tips to Win With Yvonne To get the most from Yvonne, follow these practical tips: Use her control triggers early — setting up tempo pays off more than waiting Don’t chase burst only — consistent damage often wins longer engagements Coordinate weapon procs with team support rotations Position her where control effects matter most (chokepoints, wave transitions) Watch cooldown windows — unlike burst units, Yvonne shines when uptime is predictable This approach makes her feel more like an orchestrator than a solo nuker. 📈 Why Yvonne Matters in the Endfield Meta Yvonne’s value is more than the sum of her damage. She: stabilizes messy fights improves team rhythm provides reliable output without niche requirements scales smoothly across content tiers This consistency makes her a meta staple in mixed compositions, not just a situational pick. 🧠 How to Progress With Yvonne Quickly To make Yvonne strong early and keep her relevant: Invest in her core weapon path first Choose balanced or control-oriented gear sets Build teams that cover gaps she doesn’t fill Practice tempo control in every mission Save fast rotation consumables for test runs This ensures Yvonne feels strong consistently, not just on paper. Players looking to power up Yvonne in Arknights: Endfield can browse verified Accounts to build a competitive roster early, book professional Hourly Services for team optimization and rotation planning, or use trusted Boosting services to climb faster and dominate tougher stages. When a character rewards strategy and rhythm over brute force, the smartest builds win—not just the biggest numbers.GameMarket.gg is a trusted digital marketplace for everything gaming-related, providing secure access that enhances every gaming journey.
Showing 16 of 30 from 43 Results