
Summit Map Valorant — Complete Strategy & Wall Mechanics Guide
By GameMarket Team 26 June 2026, 11:00 WIB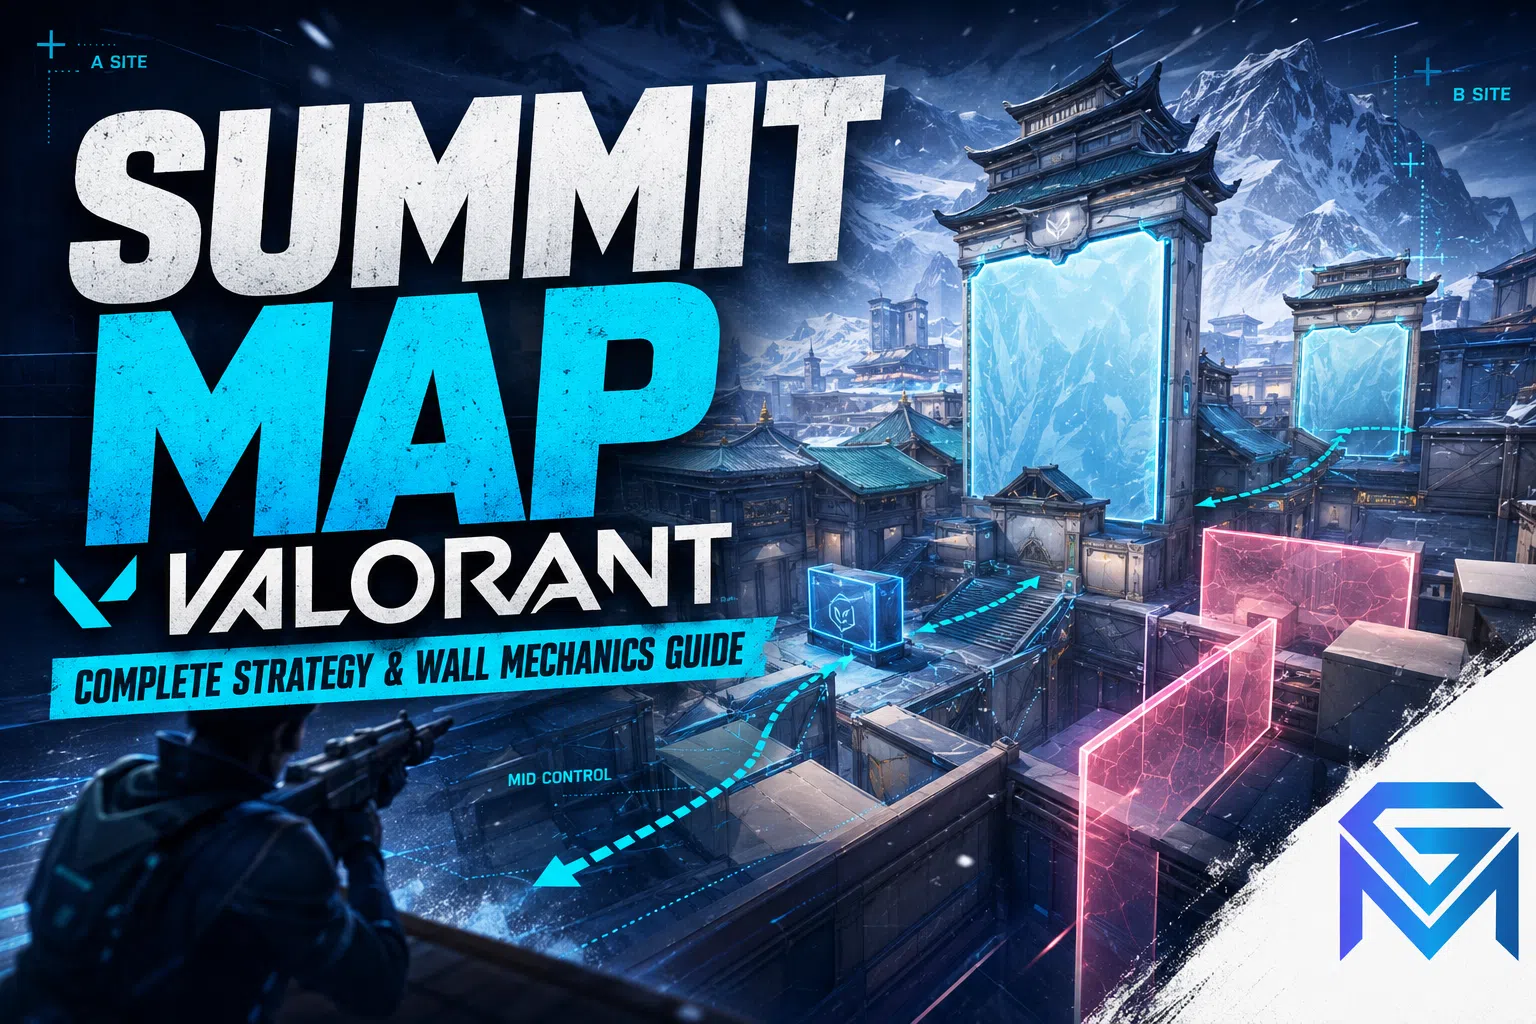
Summit landed in Valorant on June 23, 2026 alongside Patch 13.00 — and it's the most mechanically ambitious map Riot Games has shipped since Corrode. The 13th standard map in the rotation drops Players into a Radiant training academy in the mountains of Zhangjiajie, China, with a defining gimmick that no other map currently offers: three permanently droppable walls that fundamentally reshape sightlines and rotation paths mid-round. The map you fight on in Round 13 may look nothing like the map you played in Round 1. This is the complete Summit map guide for Players ready to learn the new map during its 2-week ranked protection window.
🏔️ Summit Map Overview
Launch Date: June 23, 2026
Patch: 13.00 (Season 2026 // Act 4)
Setting: Radiant training academy in mountains of Zhangjiajie, Hunan, China
Layout: 5v5 Spike mode, two sites (A/B), three-lane structure
Defining Mechanic: Three permanently droppable walls
Lore Connection: Sage's home academy before joining Valorant Protocol
Summit follows a familiar three-lane skeleton — attacker spawn feeds into A Lobby and B Lobby with Mid serving as the connector — but the droppable wall system makes it functionally unlike any other map in the pool. Combined with vertical elevation layers, wide-open sightlines on certain angles, and lore ties to Sage's character backstory, Summit demands new strategic thinking from Players who default to standard execution patterns.
The map joined Competitive queue immediately at launch, with a 50% RR loss reduction for the first two weeks to cushion the learning curve. Master Summit during this protection window before standard rank consequences return.
For complete Patch 13.00 context covering Sentinel buffs, Initiator cooldown reductions, and the new Retake 3v3 mode released alongside Summit, see our Valorant Patch 13.00 Live Coverage.
🚪 The Droppable Walls — Summit's Defining Mechanic
Three droppable walls sit on Summit: one on A Site, one on B Site, and one in Mid. Each wall is tied to a shootable switch panel located nearby. Once a wall drops, it stays closed for the rest of the round — there is no way to reopen it.
How Walls Drop:
- Switch panels have 125 HP and drop after a few standard gunfire shots
- Abilities can trigger walls instantly — Sova Shock Dart, Raze Showstopper, Brimstone Incendiary, similar damage-dealing utility
- Any player on either team can activate any wall
- Walls deal damage to players caught directly beneath them when they fall
Strategic Wall Decisions:
The walls are NOT free utility — they're commitment tools. Dropping a wall reshapes the map for the rest of the round, affecting BOTH teams. Timing matters as much as the decision itself.
Attacker Wall Strategy:
- Pre-execute drop: Cut off defender rotation paths before your push lands. Isolates the site for clearer fights but commits you to that site
- Post-plant drop: Eliminates retake paths after the Spike is down. Simplifies post-plant defense but locks out your own flanking routes
- Mid wall drop: Splits the map and forces defenders into specific rotation choices
Defender Wall Strategy:
- Early drop on uncoordinated push: Stalls execution by approximately 10 seconds, forcing attackers to reset
- Site wall drop: Funnels attackers into narrower entries — but locks your own rotators out of that path if the other site gets hit
- Mid wall drop: Cuts off split pushes but limits your own information gathering across Mid
The fundamental rule: dropping a wall benefits whoever has already established position. If you drop a wall before securing space, you may trap yourself out of useful positions for the round.
🗺️ Map Layout & Key Areas
Attacker Side:
- Attacker Spawn — Feeds directly into A Lobby and B Lobby
- A Lobby — Pre-A Main staging area
- A Main — Primary attacking route into A Site
- B Lobby — Pre-B Main staging area
- B Main — Primary attacking route into B Site
A Site Area:
- A Site — Smaller plant zone with compact geometry
- A Link — Connects A Site to Mid Bend and Mid Fountain
- Garden / Boxes — Common defender holding positions; attackers must clear before committing
- A Site droppable wall — Cuts off specific defender angles when triggered
B Site Area:
- B Site — Larger plant zone with more post-plant room
- B Link — Connects Mid Bottom to B Site
- B Trophy / B Gym / B Tower — Deeper defender angles, harder to clear without utility
- B Site droppable wall — Defender-side mechanic affecting site geometry
Mid Area (Most Important):
- Mid Fountain — Key control point; team that wins this area threatens both sites
- Mid Bend — Connecting area between Mid and A Link
- Mid Bottom — Lower Mid connection to B Link
- Mid droppable wall — Splits the map when triggered, forcing committed rotation choices
Summit plays larger than Ascent or Sunset, with mid connectivity comparable to Haven. Teams that ignore Mid will consistently find themselves out-rotated. Mid Fountain control gives the attacking team rotation options to either site within seconds.
📋 Map Pool Changes (Patch 13.00)
Joining Competitive Rotation:
- ✅ Summit — New map
- ✅ Sunset — Returns to rotation
Leaving Competitive Rotation:
- ❌ Fracture — Removed
- ❌ Pearl — Removed
Players who specialized in Fracture or Pearl executes need to refresh their agent pools and default strats. Sunset's return brings classic mid-control gameplay back into the rotation, balancing Summit's chaos with familiar fundamentals.
🎯 Best Agents for Summit
Sentinels (HIGHEST PRIORITY)
- Sage — Lore tie + wall manipulation expert. Slowing orbs near wall buttons create kill opportunities. Her Sage walls combined with droppable walls give defenders massive zoning control. With Patch 13.00's Healing Orb self-heal buff (50 → 100 HP), she anchors A Site exceptionally well
- Cypher — Cameras DO NOT die when a wall drops next to them. Place camera before triggering wall — instant hidden information source. With faster Trapwire windup (0.9s → 0.7s) from Patch 13.00, his setups punish attackers harder
- Killjoy — Turrets get +50% fire rate from Patch 13.00; Nanoswarm 5-second duration zones the new wall flanks effectively
- Deadlock — GravNet 50s cooldown (down from 60s) means more uptime against fast pushes
Controllers
- Omen — Default flex pick. His new Shrouded Step audio (Patch 13.00) is slightly more obvious — adjust ambush timing
- Viper — Strong on attack side; her wall divides Summit's open areas effectively
Initiators
- Sova — Shock Dart instantly triggers wall panels from safe distance. Recon Bolt clears multiple corners simultaneously. The signature cooldown reduction from Patch 13.00 means more utility per round
- Skye — Vents around Summit give her flashes more bounce paths than on most other maps. Faster Guiding Light cooldown enables more aggressive utility cycles
Duelists
- Jett — Dash + updraft work well with Summit's vertical positions
- Raze — Showstopper instantly drops walls. Satchel mobility exploits vertical positions
Safest Ranked Composition: Omen, Raze, Sova, Cypher, Sage. This composition gives flexible smokes, corner clearing, information, flank control, healing, stall, and post-plant value — all critical on Summit's complex geometry.
⚔️ Attacking Strategy
Phase 1: Establish Mid Control
- Don't rush A or B without checking Mid first
- Mid Fountain control opens both sites for rotation
- Losing Mid forces predictable site hits with limited options
- Use Initiator recon (Sova darts, Skye flashes) to clear Mid corners
Phase 2: Site Commitment
- Clear Garden, Boxes, and defender-side angles before A pushes
- B pushes require deeper clears due to multiple holding positions (B Trophy, Gym, Tower)
- Use vents for utility bounce paths that defenders may not expect
- Don't activate site walls before taking space — you'll trap yourself out of useful flanks
Phase 3: Post-Plant Positioning
- Plant with vision on possible retake angles
- A Site plant area is compact — post-plant positions force on-site or behind-cover holds
- B Site offers more post-plant room — utilize the deeper geometry
- Drop site wall AFTER plant to lock out defender retake paths
- Keep one player close to site, one watching Mid/flank, one saving utility for defuse tap
🛡️ Defending Strategy
Information Gathering (Without Dying)
- Hold space and delay pushes rather than over-rotating
- Keep at least one player watching Mid every round
- Use Sentinel utility (Cypher, Killjoy, Sage, Deadlock) to slow A or B entries
- Fall back after getting information instead of dying deep on site
Wall Decision Points
- Drop site walls only when you spot uncoordinated attacker pushes — stalls execution by ~10 seconds
- Don't drop Mid wall unless you've committed to a specific site read — locks out your own rotations
- Use Sage wall + droppable wall combos to completely shut down attacker entries
- Place Cypher camera BEFORE dropping nearby wall — camera survives, gives you hidden info source
Retake Approach
- Save at least one smoke, flash, stun, molly, or slow for retake
- If site is lost, wait for teammates and retake together — don't swing one by one
- Reactive walls may have cut off your normal retake path — adapt accordingly
- Use vents and elevation positions for unexpected angles during retakes
💡 Pro Tips for Summit
- Learn switch panel locations — Memorize all three before queuing ranked
- Practice utility-based wall drops — Sova Shock Dart, Raze Showstopper, Brimstone Incendiary all trigger walls remotely. Safer than shooting switches under fire
- Cypher cameras survive walls — Place camera, then drop wall = hidden info source that defenders can't easily counter
- Vents enable bounce utility — Multiple vents around the map create unexpected flash paths and grenade trajectories
- Walls can kill — Don't stand directly under a switch panel when teammates or enemies might shoot it
- Warm up close-range aim — With walls closed, Summit becomes a short-to-medium range arena. Spectre, Sheriff, Phantom feel strong
- Use the RR protection window — 2-week 50% RR loss reduction is the best time to experiment with agents and strategies
- Queue Summit Only for 7 days — Swiftplay format = fastest way to internalize callouts and wall timing without rank stakes
- Wall timing > wall presence — Reflexively dropping walls wastes the mechanic. Coordinate with team executes
- Adapt agent picks to wall reads — Summit changes round-by-round; your default strat may need adjustments mid-match
📊 Early Meta Observations
Based on the first 48 hours of Summit ranked data, early patterns are emerging:
- Slightly defender-favored — Initial community testing shows ~49.6% attacker win rate / 50.6% defender win rate, indicating near-balance with slight defensive edge
- Sentinel meta dominant — Combined with Patch 13.00 Sentinel buffs, this map class is the strongest pick priority
- Initiator value high — Sova and Skye performing above their general meta benchmarks
- Duelist value lower than average — Compared to maps like Bind or Haven, Duelists feel less critical due to information demands
- Cypher pick rate climbing — Wall-camera synergy creating unique tactical value
- Sage pick rate climbing — Lore tie + buffed self-heal + wall manipulation = breakout map for Sage mains
Expect meta refinement over the next 2-3 weeks as community theorycrafting and pro play patterns establish optimal strategies. The early data suggests Summit will become a Sentinel-centric map similar to how Bind favors Brimstone or Haven favors Cypher.
🎯 Common Mistakes to Avoid
- Treating walls as free utility — Reflexive drops without team coordination waste the mechanic
- Ignoring Mid — Skipping Mid control = predictable site hits and easy defender rotations
- Standing directly under switch panels — Wall drops deal damage; teammates shooting nearby can kill you accidentally
- Defaulting to Fracture/Pearl strats — Those maps left the rotation; old defaults don't apply
- Single-team Sentinel composition — Skipping Sentinel = punished hard by Summit's complex angles
- Pushing A without clearing Garden/Boxes — Defender-side angles eat attackers who rush
- Over-rotating as defender — Attackers can punish empty sites through Mid splits
- Forgetting that Cypher cameras survive walls — Letting an enemy Cypher's camera live behind a dropped wall is free intel for them
- Wasting RR protection window — 2 weeks of 50% RR loss reduction shouldn't be spent autopiloting old habits
🏆 Summit Map Climb Plan
For Players prioritizing rank push during the protection window:
- Days 1-3: Queue Summit Only Swiftplay matches. Learn callouts, wall switch locations, and rotation paths without rank pressure
- Days 4-7: Mix Summit Only with standard ranked. Test agent picks (Cypher, Sage, Sova) in low-stakes environment
- Days 8-14: Full ranked queue with refined strategies. Push for RR gains while losses are still 50% reduced
- Days 15+: Standard RR penalties return. By this point, Summit fundamentals should be muscle memory
Don't waste the 2-week protection window grinding old habits. Use it specifically to internalize Summit-specific play patterns.
💎 What Comes With Summit Launch
Patch 13.00 brings more than just the new map:
- Retake 3v3 mode — New limited-time mode with post-plant focus and randomized loadouts
- Blackspyre Collection — Premium skin line for Phantom, Sheriff, Spectre, Ares, plus Divide melee
- New Battle Pass — Including Sky Reaper Ghost, Heal Up Squad Card, Blep Spray
- Major Sentinel buffs — Cypher, Killjoy, Vyse, Sage, Deadlock all improved
- Initiator cooldown reductions — Sova, Fade, Skye, Breach, KAY/O, Gekko
- Miks full ranked rollout — Croatian Controller now Competitive-legal
For complete Patch 13.00 changes including agent balance details and ranked rating recalculations, see our Patch 13.00 breakdown. For Act 4 pre-launch context including what Players expected before notes dropped, see our Act 4 Launch Preview.
🛒 Push Your Summit Climb
The 2-week ranked protection window for Summit closes July 7, 2026 — and Players who master the map during this window will hold the competitive edge through the rest of Act 4. Players ready to dominate Summit from the early meta can explore trusted Valorant Accounts with established rank histories ready for the new map push, accelerate every Battle Pass tier and challenge with expert Valorant Hourly Services, or push your rank ceiling through reliable Valorant Boosting.
GameMarket.gg is a trusted digital marketplace for everything gaming-related. We serve the gaming community by providing secure access that enhances every gaming journey.