Genshin Impact Guide: Radiant Moongecko Strategy
By GameMarket Team 26 February 2026, 09:00 WIB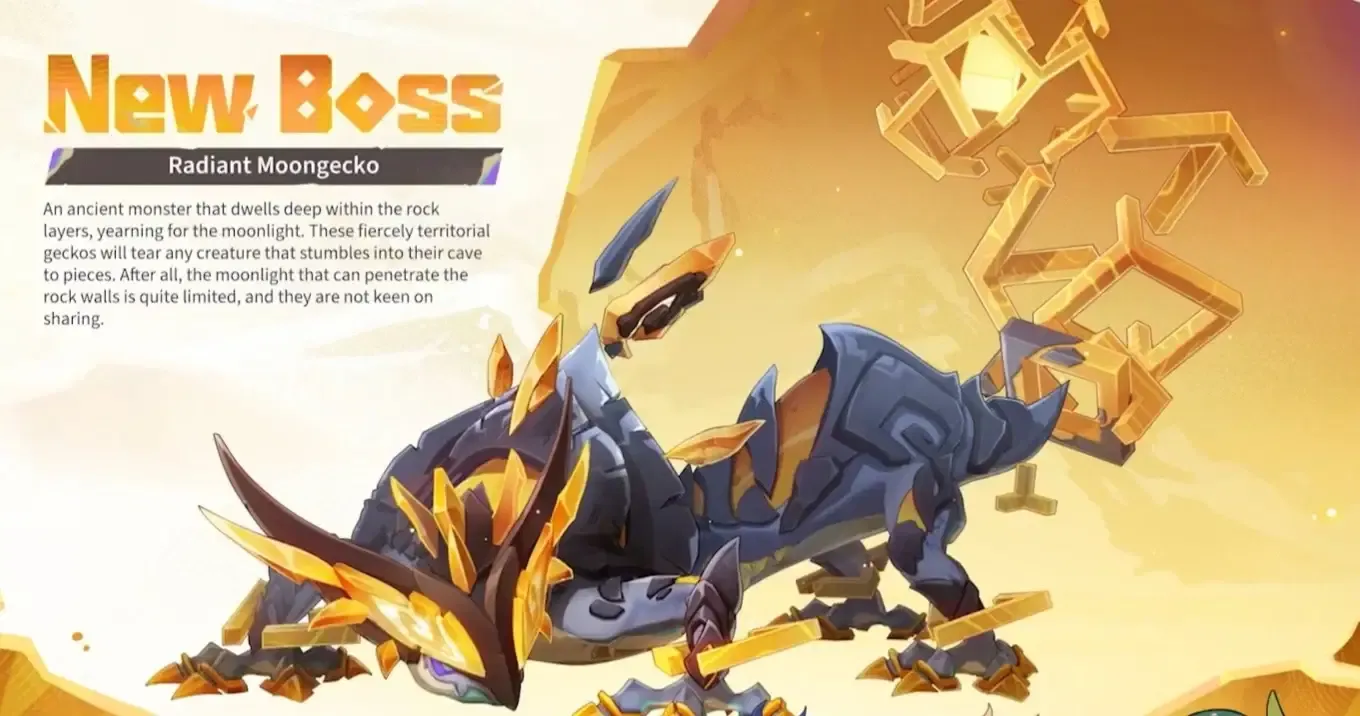
🦎 Genshin Impact Guide – Radiant Moongecko Boss
This Guide provides a full encounter breakdown of the Radiant Moongecko in Version 6.4, including precise location routing, shield mechanics, Radiant Cocoon debuff management, optimized team compositions, F2P solutions, drop materials, and efficient farming strategy.
Radiant Moongecko doesn’t roar its challenge the way weekly bosses do. Instead, it waits underground in Nod-Krai—silent, crystalline, coiled beneath waterfalls and fractured stone. But once the battle begins, its mechanics quickly reveal why it serves as 6.4’s ascension gatekeeper. Layered Geo shields, anti-CRIT debuffs, and healing suppression force you to approach this fight with structure rather than brute force. If you treat it like a simple DPS check, the Cocoon will punish you. If you understand its rhythm, the fight becomes clean and efficient.
📍 Radiant Moongecko Location – How to Reach It
Radiant Moongecko is found in northern Nod-Krai, inside the underground caverns of Wavechaser Plain.
Route 1 – Statue of the Seven Path
-
Teleport to the waypoint north of the Statue of the Seven in Wavechaser Plain.
-
Travel southeast toward the waterfalls.
-
Glide carefully down the cliff.
-
Enter the cavern at the base of the falls.
-
Follow the descending tunnel.
-
Unlock the underground waypoint for faster resets.
-
Continue until you reach the boss arena.
Route 2 – Favonius Keep Path
-
Teleport to the waypoint on the right side of Favonius Keep.
-
Enter the massive cave along the cliff wall.
-
Follow the internal tunnel system.
-
The Moongecko’s arena lies deeper within.
Unlocking the underground teleport drastically improves farming efficiency.
⚔️ Radiant Moongecko Mechanics Explained
🛡 The Multi-Layered Geo Shield
Radiant Moongecko’s defining mechanic is its stacked Geo shield, represented by multiple shield bars beneath its HP.
Shield Activation Cue
-
Moongecko lifts its tail.
-
Geo energy glows along its crystalline spine.
-
Shield bars appear.
While shielded:
-
Front and side damage is heavily reduced.
-
Only effective shield-breaking attacks progress the fight quickly.
Best Shield Counters
-
Lunar-Crystallize reactions
-
Direct Geo damage
-
Claymore heavy attacks
-
Plunging attacks
Each shield bar destroyed:
-
Deals direct HP damage.
-
Shortens the defensive phase.
-
Prevents prolonged Cocoon stacking.
Strong teams can sometimes eliminate the boss before multiple shield cycles occur.
⚠ Radiant Cocoon – The Real Threat
Radiant Moongecko applies Radiant Cocoon, a debuff that:
-
Increases damage taken.
-
Prevents CRIT hits.
-
Reduces healing effectiveness.
The inability to crit significantly reduces burst consistency.
How to Remove Radiant Cocoon
You must heal the affected character to 100% HP.
Partial healing does not cleanse it.
This transforms the fight into a sustain management test rather than pure DPS optimization.
🧪 Optimal Team Archetypes
🐺 Claymore & Geo Core
Heavy hitters thrive here.
Examples:
-
Varka
-
Diluc
-
Itto
-
Navia
-
Noelle
Claymore attacks shred shield layers efficiently without requiring precise elemental setups.
⚡ Lunar-Crystallize Teams
Reaction-based teams combining Geo with other elements accelerate shield break.
Effective picks:
-
Zibai
-
Columbina
-
Illuga
-
Xilonen
These teams turn shield phases into burst windows.
🏛 Shielded Sustain Teams
When survivability is prioritized:
-
Navia / Zhongli / Furina / Bennett
-
Diluc / Xianyun / Zhongli / Bennett
Zhongli’s shielding prevents unnecessary Cocoon stacking while Claymore damage handles shield bars.
🩺 Healer Priority – Full Restoration Matters
Radiant Cocoon forces healer evaluation.
Strong Full-Heal Options
-
Kokomi
-
Furina
-
Xilonen
-
Xianyun
Bennett provides offensive value but caps healing at 70%, which may delay Cocoon removal.
If Cocoon persists:
-
Damage spikes.
-
CRIT suppression stalls burst.
-
Fight duration increases.
Healing to full immediately restores combat efficiency.
🆓 Best Free-to-Play Team
Noelle / Gorou / Yun Jin / Bennett
Why it works:
-
Noelle provides Geo damage and sustain.
-
Gorou boosts Geo synergy.
-
Yun Jin enhances Normal Attack scaling.
-
Bennett offers ATK boost.
This team balances shield destruction and survivability without premium pulls.
🎯 Combat Flow – Step-by-Step Strategy
Phase 1 – Engage & Build
-
Establish rotation.
-
Generate energy.
-
Watch for tail lift.
Avoid overcommitting before shield phase.
Phase 2 – Shield Break
Once shield activates:
-
Switch to Claymore or Geo.
-
Focus on shield bars immediately.
-
Ignore small damage windows elsewhere.
Destroying shield quickly reduces Cocoon pressure.
Phase 3 – Debuff Management
If Radiant Cocoon triggers:
-
Prioritize healing.
-
Avoid reckless burst attempts.
-
Cleanse before committing to DPS rotation.
Phase 4 – Burst Window
After shield breaks:
-
Full rotation.
-
Use Ultimates.
-
Maximize CRIT consistency once Cocoon cleared.
Repeat until defeated.
🎁 Radiant Moongecko Drops
Ascension Materials
-
Prithiva Topaz Sliver
-
Prithiva Topaz Fragment
-
Prithiva Topaz Chunk
-
Prithiva Topaz Gemstone
-
Prismatic Severed Tail
Key Use
Prismatic Severed Tail is required for Varka ascension.
Expect repeated farming if building him.
Artifact Drops
-
Traveling Doctor
-
Instructor
-
The Exile
-
Gladiator’s Finale
-
Wanderer’s Troupe
Standard overworld boss artifact pools.
🗺 Blueprint: Efficient 6.4 Farming Loop
Step 1
Unlock underground waypoint.
Step 2
Bring:
-
1 Geo/Claymore DPS
-
1 Strong full healer
-
1 Sub-DPS
-
1 Flex support
Step 3
Break shield immediately.
Step 4
Cleanse Cocoon via full heal.
Step 5
Burst during exposed window.
Repeat using teleport reset.
Radiant Moongecko anchors the early progression of 6.4, especially for players investing in Varka. Travelers aiming to accelerate ascension farming can explore trusted Accounts, optimize resin efficiency with expert Hourly Services, or secure consistent boss clears through reliable Boosting as Luna V farming rotations intensify.
Radiant Moongecko rewards structure. Break the shield cleanly, cleanse the Cocoon quickly, and the fight becomes predictable. Ignore either mechanic, and Nod-Krai reminds you why it guards its power so fiercely.
GameMarket.gg is a trusted digital marketplace for everything gaming-related. We serve the gaming community by providing secure access that enhances every gaming journey.



![Genshin Impact Accounts Others ASIA|AR 42|2 Limited [Flins,Ineffa]+Mizuki,Mona|QA Liyue|Check SS|TakeMail(GI1391Z)](https://img.gamemarket.gg/products/ie5bprdb/genshin-impact-accounts-asia-ar-42-2-limited-flins-ineffa-mizuki-mona-qa-ysu-thumbnail.webp "ASIA|AR 42|2 Limited [Flins,Ineffa]+Mizuki,Mona|QA Liyue|Check SS|TakeMail(GI1391Z)")